Borderlands 1
Maxed-Out Start

Contents:


I played BL1 for a long time with the original version on a 360. However, when I got an Xbox-X, the graphics in the game were badly blurred in some places, such as the vending machines, which just looked like blobs.

So I finally got the GOTY version with 4k graphics support. This not only fixed the blur problem but all the graphics - even those that weren't badly blurred - are much sharper and brighter, and many things in the game have been updated, including much faster transitions between scenes. Also included is a chest of top loot with about 60 keys.

It was well worth the $15 Amazon was charging for it plus it includes the DLC's required for this document.

So the info here assumes you are using the GOTY version. Even with that assumption met, the fact is that BL1 does not play the same way every time. Not only are there variations built into BL1, but even after 15 years it appears that they are still making changes to BL1.

So any advice given here should be read with the understanding that your results may vary.

I always play as a Soldier, so that is what this document is based on; however, the basic info should also apply to other character types. Also, my machine is an XBox-X, so I may make references to controls that are different on other machines.

A problem which may or may not apply to anyone playing BL1 GOTY on an XBox-X is that if I stop playing a game for a while, then when I try to continue it, when I get to the Main Menu and click Start Game, the game hangs up on Retrieving Saved Games, even though I only have one or two saved games.

If you leave it running long enough, it may get unstuck, but it may get stuck there again shortly. When doing the Infinite XP, you have to exit and continue every minute or so and if you don't want it to get stuck every time, you have to follow these steps:  Image

  1. Press the XBox button at the top, middle of the controller.
  2. Arrow down to Borderlands GOTY and press the right button ("Options") below the XBox button.
  3. Arrow down to Manage Game and press the A button.
  4. Arrow down to Saved Data and press A.
  5. Arrow down to Reserved Space and press A.
  6. Arrow left to Clear Reserved Space and press A.
  7. Press B twice and press A on Borderlands GOTY.

This will restart and eventually take you back to where you last stopped.


Why an Early Boost to XP and Money?

If you find that playing BL1 straight through results in getting your bottom kicked, increasing your XP and money early in the game can give you some revenge.

Of the two, the money glitch is the easiest way to level up a bit without breaking the game. But I really enjoy doing both.

I always try to get up to level 42 using the Infinite XP glitch, but you can stop at a lower level or keep going for a higher level if you wish. Twice (out of dozens of games) I screwed up the Infinite XP glitch and either had to start over or continue playing at the level I had reached.

Once I was about level 25. Long story short, that wasn't enough fun to keep going past New Haven, so I quit there and started a new game. Most recently I somehow screwed up the process at level 30 and really tried to make a go of it, but eventually gave up and restarted.

Another time I was at level 35 when I messed up and couldn't go any higher using the glitch. But that was high enough to go back to T-Bone to finish looting enough high-level gear with which to do the T-Bone missions.

When playing at level 35, I came across a mod which increases XP earned by 20%. I had never used it before but decided to use it this time and by the time I finished the Armory, I was at level 42 -- an increase of 7 levels. All the times I've started the T-Bone missions at level 42, I have only gone up 1 level by the end.

The reason is that the higher your level, the less XP you get. For example, I was getting over 4000 XP for a Drifter at level 35 or so. Today I had my regular start of T-Bone missions at level 42+ and only got about 325 XP from the Drifter. Even though I had found an XP mod, the amount I was getting for killing villains was so small that using the mod wasn't worth the effort.

Infinite Money

You can start working on infinite money as soon as Fyrestone's New-U shows the DLC's, which is after the Skaggs At The Gate mission, but I always do the med machine repair mission too since I know I will be coming back soon to get my XP up which requires the med machine.

The DLC you want to go to is the one in T-Bone Junction. Once there, you just repeatedly loot the chests and lockers to pick up high-valued gear.

The gear at T-Bone starts at Level 28 or so. You can be at level 3 and pick up the gear. You can't use it because it's way over your level, but you can sell the gear for a lot of money. While most of the gear will be in the $5k to $25k range, some may sell for over $100k. Level 3 gear sells for about $25 (note: NOT 25, which is $25,000).

(Another change I've noticed in April 2024 is that the value of gear that you get from a chest used to be the amount it would sell for in a machine, but now it sells for around 20% less. Also, most loot in the armory retains the value shown and can be sold for that amount, but a small percentage loses value just putting the loot into your backpack. Either I have missed this happening in the past, or they changed BL1.)

The ammo SDU's from the T-Bone ammo machines let you greatly boost the amount of ammo you can carry for each weapon type. For example, you start BL1 with rifle ammo capacity of just 280 rounds. In T-Bone, you can get an SDU to expand the capacity to 980 rounds.

Unlike the other gear at T-Bone, the ammo SDU's have no level requirements. However, they cost about $223,000 per weapon, so you need over $1 million to upgrade your favorite 6-7 weapon types. This normally has the effect of having a level requirement since without the Infinte Money glitch, you would never have the cash for these upgrades at lower levels.

There are alternatives to maxing out the ammo SDU's:

Image One alternative is mods which regenerate ammo. Some mods will work only with a specific type of weapon, but most of them will work with all weapons (except grenades).

Also, some weapons will regenerate ammo for itself, but such weapons usually are not as good overall as the same type of weapon without regen built in.

Notice that like most mods, regen mods can come with bonus skill enhancements plus bonuses such as increases in magazine size, weapon damage, firing rate, etc. When there is a choice between, say, a +12 regen with one of these latter weapon enhancements and a +13 without one, I would stick with the +12, but for +2 more, I would go with the greater regen rating such as +14 rather than +12.

Even if there are other mods you normally want to use instead, such as to increase weapon damage, you can still use them in combat and then swap in the regen mod during a lull in the action and let it refilll your ammo. Even if you do max out the SDU's, it's a good strategy to get a regen mod for emergency use.

Moving along... To prepare for looting, empty your backpack to make room.

If you plan on doing the Infinite XP glitch to get to level 37+, you won't need whatever gear you started the game with, so just sell it; otherwise, go to Underdome DLC and store all your gear in a safe to get back when you are through with Infinite Money.

Next you should go to Scooter to get the Monster mission in order to get a car for getting around faster. See Major Slack's video showing the general route to take when looting and getting the car parts. However, this document improves some of the info in the video, in my totally unbiased opinion.

For example, having gotten a car, your first loot site is above the Bounty Board. It has a chest and three lockers. The video ignores the lockers even though the middle locker always has gear and the other two will have gear, ammo or cash, so they are worth checking.

Follow the video to get to the next loot area which has two chests and several lockers. After doing that, I again differ from the video:

Check your backpack to see if you have four empty slots since the upcoming boat may have four items. If you don't have the slots, stop at the gun store and sell stuff. Continue up the road which ends in a circle, but go around the left side to change the red light to green.

Continue around the circle to the ramp out to the boat. Drop down to the boat and loot the chest. Jump out of the boat to come up at the green light. Go into Zed's and sell anything you don't want to keep. Check the mods for anything you might want (and have the money for). The main mod I look for is one that replenishes ammo. I also look for a shield with high damage resistance (800+).

Early on, you won't have enough money to buy gear from the med machine, plus you still have a lot of looting to do where you might get the same gear from a locker for free.

Save-exit-restart to come up at the T-Bone's Fast Travel station. To keep anything you just looted, go to Underdome and store it. Come back and go to Scooters for another car.

If you are going to do the unlimited XP, you can return to Fyreside after you've accumulated about 250000 cash.

If you only want to do the unlimited money, repeat the loot loop until you have about $1.5 million, assuming your goal is just to get the ammo SDU's, and you can stop reading any further and after getting the SDU's, you can return to Fyrestone to resume doing the missions there. Otherwise, keep reading...

You are unlikely to get a good shield or specific mod that you want just by looting, and there is only one med machine which has mods and shields in T-Bone versus 3 ammo machines.

There are two roads which go out of T-Bone. One goes south and the other, north. When you get through the first waypoint on each, immediately to one side or the other you will see a Catch-A-Ride place with ammo and med machines.

It doesn't take long to get to them and it triples your chances of getting the shield or mods you want. If you have not been able to find the type of grenades you want, you also get two more ammo machines to search.

When I start a looting loop, I get a car first then go to the Bounty Board to check the chest and lockers there. (In the video, he just runs to the Bounty Board and back before getting the car which wastes time.)

After leaving the Bounty Board, turn on the road and go to each of the two waypoints. While looking at the machines there, you can also sell the loot you just picked up and don't have to worry about running out of backpack space for the rest of the loot you are going to pick up.

Again, the med machines are very expensive, so you should focus on trying to find the gear you want by looting and try these other machines if you have a million or so to spend.


Infinite XP

This glitch depends on your selling 1200 of anything which earns you 20000 XP, then buying back the 1200th item, which reduces your number of items sold to 1199 without taking away the 20000 XP. Next press the Pause button (to the left of the X button on the Xbox), press Exit, then Exit again on the next window, then reload and repeat this loop.

While you can sell any items, med kits are the cheapest and easiest to sell. A kit costs 140 and you get 20 for sellling one, for a net cost of 120 each times 1200 = 144000. Once you get to 1200, you no longer have to buy kits because after selling each one, you buy it back.

Check to make sure that when starting this glitch, you haven't already sold more than 1200 items, which would be extremely unlikely if you do this early in the game, but as seen below, you may need to check the number sold later, so here's how to do it: 

  • Go to the Mission Log page of your Echo device.
    One of the tabs on that page is for the Challenge Log.  
  • On the XBox, press Y to get to the Challenge Log. 
  • Scroll to the Merchant of Death line. (On the GOTY edition of BL1, you can scroll up from the bottom and get to it much quicker.) 
  • On that line, you should be below 1200.

I use the Infinite XP glitch to get to level 43. This requires about $150k. When I first come to T-Bone, I do one looting circuit while getting the car parts for the Monster mission and a second loop to get over $150k+ .

This video shows how to get the XP. You start by buying as many cheap med kits as your backpack can hold, then selling them back. Starting as early in the game as we are, your backpack capacity is 12, so you can buy/sell only 12 at a time.

Repeat until you have sold 1200 med kits, at which point you get 20000 XP, then buy back that 1200th which reduces your total sold to 1199, but does not take away the 20000 XP nor the level-up point you got for selling the 1200th (assuming the 20000 XP was enough to level you up).

Now exit the med machine and you should see "20000" go down the middle of the screen. If you don't see the 20000, reopen the med machine to verify that you have a med kit in the Sell page. If so, sell it then go to the BuyBack page to buy it back, then exit the machine again.

If you still don't get the 20000, check the Merchant of Death line which should show that you have sold 1199. Recently, I did this and it only showed 1099, not 1199, so I just kept going and all was well.

After the 20000 disappears from the bottom of the screen, press the Pause button, then scroll down and click on Exit which should bring up another window verifying that you want to Exit. If instead you get the window that says Quit, DO NOT QUIT. It means that you did not let the 20000 disappear. Now open a locker to the right of the vending machine and try the Pause button again, then exit-save-return and repeat as often as you want, getting 20000 XP each time. (Hereinafter referred to as a "loop".)

Each time you complete a loop, open the med machine. You will be on the "Buy" page, but do NOT buy anything. Instead, go to the "Sell" page. You should see that 1200th med kit again. Sell it and go to the "BuyBack" page and buy back the med kit you just sold. The BuyBack page should now be empty. THIS IS OF CRITICAL IMPORTANCE.

If you neglect to buy back the 1200th med kit then that kit will not be subtracted from the 1200 sold to get back to 1199 and thus you cannot get the 20000 for selling the 1200th kit again. All you can do then is start the game over.

I've done the Infinite XP glitch dozens of times and only screwed it up 5-6 times, but it really hurts to be close to getting to your level goal and have to start over from scratch.

The last two times I screwed up, I was at level 37 and the last time, level 35. Both times I kept going and got a mod for +22% (or so) extra XP when XP is earned. Both times I finished T-Bone/Armory around level 42, so I didn't lose too much ground compared to doing the glitch up to level 42, since you get a lot more XP at level 35 with the mod than at level 42.

DO NOT SELL MORE THAN 1200 OR YOU HAVE TO START THE WHOLE GAME OVER.

I use math to keep track of when I'm getting close to 1200 sold.

Click here to see the math.

If there is some easier way to keep track of how many you've sold, I have not discovered it.

In the video, the guy says that you can reach 1199 in "5-10 minutes at the absolute most".

Here's the math for that:

    5 minutes x 60 seconds = 300 seconds.
    One loop is buying 12 and selling 12.
    It takes 100 loops to sell 1200.
    That is 3 seconds per loop. Unlikely. Even 10 minutes is 6 seconds per loop. Still unlikely.

I don't know what gear he is using, but on my Xbox X, it takes 15-20 minutes, and getting to 1199 is the fast and easy part. Of course, if you have already sold a lot of items prior to starting this, you will reach 1199 faster. I'm usually at 25-30 items sold when I start it.

Getting from selling 1199 up to getting your level to 43 (or so) is the time-consuming part because it takes time having to save-exit-reload after each sell-rebuy.

Also, the higher the level you attain, the longer it takes to get each level-up. Prior to level 17, the 20k XP you get is normally enough to take you to the next level. To get to level 17 requires 167k XP, then level 18 requires 196k XP, which is a 29k increase.

This trend continues until you go from level 41 to 42, which requires going from 1967k to 2104k XP, which is +137k or about 7 save-exit-reload-sell-rebuy loops for this ONE level-up. At low levels, the same 7 loops gets you SEVEN level-ups.

One loop (from exiting the med machine, saving and quitting and getting back to the med machine) takes about 45-47 seconds on an Xbox X. When I do this, I start at level 7 (with 2 skill mods) and stop at level 43. By my calculations, that takes about 110 loops at a minimum of .75 minutes per loop, or 82 minutes (an hour and 22 minutes) total - minimum.

As a result, while it takes 20 minutes or so for me to get to 1199, it takes close to two hours to get from there to level 43. And it is so boring that it is easy to make a mistake and then you never get to level 43 (or whatever you are shooting for). For this reason, I break it up into 3-4 sessions, such as getting to level 25, then getting to 35, then to 43. Since it takes about 20 loops to get from level 40 to 43, I sometimes stop at 40 and do getting to 43 on my last session.

Also, 82 minutes for 110 loops requires going straight from one loop to the next with no problems and no interruptions. Two hours (plus the initial 20 minutes to get to 1199) is a much more reasonable estimation.

As long as this glitch takes, it is no worse than most other farming sessions in other games, and the payoff (looting the Gift Shop in Tartarus) gets you tons of the best loot and over 10 million dollars.

Once More, With Feeling:

Again, when you have sold 1199 items (mostly health kits), the next one you sell earns you 20,000 dollars and up one level. Then you save, exit, reload, and repeat until you reach the level you are aiming for.

The most important part of this loop is the BuyBack. This is what reduces the 1200th sale you just made (and got 20000 for) back to 1199 so that you can sell it again. When you quit and restart, the BuyBack tab is cleared out so there is no way to reduce your sales back to 1199. Then the only way to get to your level-up goal is to start a new game.

Before you exit the vending machine, look to be sure that BuyBack is blank and after the machine closes, you should see "20000" scroll down the middle of the screen and then disappear. If you don't see that, then check to see if your sales are still on 1199. If so, then just buy another item to sell.

Don't Quit without Saving:

Sometimes after pushing Pause and clicking Exit, the next window says Quit ("cannot save"). I recently saw something that made me think that this problem could come from pushing Pause too soon.

After you buy back the med quit and exiting the med machine, be sure to wait until the "20000" banner drops all the way down the screen and disappears. Only THEN should you press the Pause button. I had been getting the Quit window a big bunch of times, but since I've been waiting as just described, I have not gotten it once (when going directly to the right side of the machine).

However... Just in case you DO get it, use the following instructions:

The fastest way to fix this is to stand facing the right side of the med machine when buying and selling, then if Quit comes up instead of Exit, hit Esc twice, turn to the right and open a cash box, then do Pause-Exit again and the next window should say Exit.

For me, the above steps have almost never failed to get past the Quit in one try. If it should come up with another Quit, take the cash from the box. If it still says Quit in the Exit window, try one of the lockers. If you do so, it's safer not to take any loot from the locker you open. Such loot doesn't amount to much and risks screwing things up and having to start over because the loot may be added to your backpack.

Before I found out about the need to let the "20000" drop down and completely disappear before pressing Pause, I always went directly to the right side of the machine at the start of each loop in order to be ready if I got the Quit, but then thinking that real fix was letting the "20000" disappear, I quit taking the extra steps to get to the right side of the machine and I started getting Quit's again, so I went back to going to the right side plus letting the "20000" drop and got no more Quit's.

There are some methods which may seem simpler, such as just immediately trying Pause-Exit again, or by opening and exiting the med machine, but none of them have worked as well in the long run.

In a game on 10-09-2024, I kept track of how many "Quits" I got. The first came on level 16. By the time I reached level 43, I had gotten 39 Quits. (I think the past average was 15-20.) Fortunately, getting a Quit, and following the fix above only takes a few seconds, so it wasn't too bad.

On the next game, I got 10 Quits by level 43 with the first coming on L19. Getting a Quit Without Saving when you have done something which needs saving has got to be a bug in the software. Too bad they've never fixed it.

It's hard to imagine that the Infinite XP Glitch is not known to the programmers, which begs the question of why this bug hasn't been fixed, much less why the problem with having to start the game over remains.

While I like the Borderlands games better than the Fallout games, FO games let you save and restart games at any point you want, which would solve the problem with the Infinite XP glitch in which you may have to restart the game from scratch.

The GOTY version takes relatively longer to reload on each save-exit-reload than the original version. If you have saved a lot of past characters, this may cause the delay. Delete past characters, unless you have a good reason to save them, and it speeds things up a lot.

How High to Go:

I've played BL1 many, many times and wanted to get revenge on all the enemies that kicked my rear, which is why I decided to boost my level to 43.

Below is how my skill points are spent: I play the Soldier, and he has a Turret Skill. Every level-up I get goes to making the turret more powerful, if possible; otherwise, the upgrades marked with * are not turret upgrades but are needed to progress to where I can get the next turret upgrade. 

  • Increase turret damage.
  • * Increase all bullet damage.
  • Shooting an enemy reduces turret cooldown.
  • Guided missiles added.
  • * Increase shield recharge rate.
  • Increase turret's number of shots.
  • Increase turret cooldown rate.
  • Being near the turret regenerates health (the last 3 level-ups).

Later in the game, after topping off the health regen, I put level-up points into increasing magazine size for all weapons.

The health regens are enough to keep me fit. If I need more health, I throw some Transfusion grenades. If things still get desperate, I'll run away and deploy the turret (after it recharges) to build my health back up. This works better than having to carry a big pile of giant health kits. In fact, I've gotten to where I never buy health kits anymore.

Finish Making Money & Collecting Gear

After getting to level 43, that's all the leveling up that I can stand. The GOTY edition of BL1 came with a golden chest which is behind you when facing Zed's in Fyrestone. Google it to find how to get keys to get loot out of the chest.

The loot is at or close to your level (usually 43 for me) and is more powerful than, for example, almost any of the loot you can get by looting T-Bone Junction. One of the main things I want is a great shield, preferably higher than 800 damage resistance. You're lucky if you can get one over 600 by looting T-Bone.

If I can get a shield from the golden chest, it is likely to be in the 800-damage range. The only problem is that you may have to use a lot of keys to get a shield.

The last time I got keys, I believe there were about 60 of them. The chest gives a couple of items per key. It's never bothered me to use 5 or 6 keys in a session trying to get gear that I want. Today, I got a sniper rifle with 890 damage, which is huge, a combat rifle with 246 damage, 80 accuracy, 6.8 fire rate, and a 1.4x zoom, and a level 43 Hive Mind RPG which fires a volley of rockets.

To get these goodies, I used about a dozen keys, many more than I ever used before at one time, just trying to get a shield, but the only time I access the golden chest is when I've finished the XP level-up glitch when I can get around level 43 loot.

I finally got a shield with 767 damage resistance, which is no big deal, but a recharge rate of 223, which is extremely fast, so I was pretty happy. I sold off the chest items I didn't want. I thought that I had gotten about 500k for them, but later realized it was 5 million!!

Normally, once I have gotten to level 43+, I go back to looting in T-Bone Junction to get enough cash to buy the increased ammo SDU's and to buy mods, grenade mods, and high-level shields from machines when I can't find what I want by looting.

After each looting loop, any gear that I want to keep for later goes into the safe at Underdome before starting the next loop. This makes room in my backpack for looting.

With 5+ million in my pocket, I went straight to an ammo machine to buy the ammo SDU's. I also did rounds of the three area med machines and finally got a +13 ammo regen. With this ammo regen, I can fire the Hive Mind RPG almost non-stop without running out of rockets.

Most recently I had 16 keys left and used them all trying to get a good shield, but never got any shields. Again I got 5 million worth of other loot. Unless I can find some more keys online, I won't have any to use the next time I play this.


When looting T-Bone, here are the stats for gear I'm trying to get for doing the T-Bone missions. The enemies we face when doing the missions are usually not very powerful. For example, their rifles usually have damage ratings of 50-75 and rarely over 100.  

  • Rifles:  
      The Glorious Havoc rifles are fully automatic and can be found with damage of 125-175 with accuracy of around 70 and a rate of fire of 10-12+, and magazines of 20 to 50+. Although 70 is usually unimpressive for accuracy, the GH's other stats far more than make up for it.  
      While the GHs don't have any elemental damage, their extra-high damage ratings make up for that and also means you don't have to change weapons on T-Bone missions when facing enemies which are resistant to the element of a weapon you are using at the time. 
  • Revolvers, Shotguns, Repeaters and SMGs: 
      These weapons usually have a very poor combination of stats. For example, a revolver may have a damage rating of 200+ but will have a fire rate of 1.5 or less and a magazine size as small as 2.  
      Likewise, shotguns usually have very high damage ratings, but very slow fire rates, small magazines, very low accuracy and are mainly suitable only for close work. 
      Repeaters and SMGs have faster fire rates and magazines, but lower damage and accuracy.  
      Exceptions to the above include these legendaries: 
      • Hellfire SMG is one of the best weapons in Borderlands. A small percentage of the time one may be found when looting T-Bone in which case it becomes my primary weapon on T-Bone missions. If one doesn't drop while looting, you are unlikely to get one until the Gift Shop in Tartarus, and even then it may take lengthy farming to get one. 
      • Pestilent Defiler is a revolver with very high chemical damage. It's not that useful in T-Bone, but will be valuable in Tartarus when fighting MINAC, so if I find one in T-Bone looting, I'll keep it. Like the Hellfire, you will very rarely find one in T-Bone 
  • Other: 
      The following are less likely to be found while looting, so it's necessary to check all the nearby vending machines. 
    • Grenade mods: Transfusion and Longbow. I mainly use the Longbow for grenade jumping which comes later in the game, but I'll get it in T-Bone if I can. Those in T-Bone usually have a damage rating of 89.  
    • Shield: 600+ damage resist. Sometimes you can get on rated above 700, but in a recent game the best I could get was 550 damage.  
    • Regenerate ammo mods rated 9-11 at a minimum. A med machine may have a mod with 13 regen plus a magazine size boost, but it may cost over 1.7M caps. I often accumulate over 2M caps while looting for one of the above weapons, and it's worthing spending on such a mod.  
      An ammo regen is the most important mod. Some weapons come with ammo regen for the weapon, but usually at a cost of lower damage, etc. Since you really must get a generic ammo regen, you don't need one for a specific weapon.  
      I once got a mod which increased rifle damage by 39% and rifle ammo regen by 14%. In that game I had been unable to get a Hellfire SMG, so a very powerful Glorious Havoc rifle was my main weapon. Adding 39% to its already great damage was awesome. I could even use it for distance shooting, so I rarely needed any other weapon, but I did have a generic ammo regen mod I could swap out if needed.

Buy the SDU upgrades last. If you get $1.5 million and spend most of it on upgrades, and then find a great shield or mod that costs 600k+, you won't be able to get it because the gear in the med machine changes every time you quit and restart whereas the SDU's in the ammo machine are always available. If you still have, say, $1.5 million, you can buy any gear you want and keep looting until you accumulate the money needed for the SDU's.


Claptrap's New Robot Revolution ("MINAC"):

We are almost ready to do the T-Bone missions, but first we are going to do the MINAC missions and then come back for the T-Bone missions.

I used to do the T-Bone missions first and then go to Tartarus, but there are several advantages in doing the MINAC missions first:

  1. You may be at level 43+, but somehow many of the MINAC villians are a real handfull even though they may be level 38 or so if you finish the T-Bone missions first. But if you go to Tartarus as soon as you finish looting T-Bone and before doing the Armory mission, the MINAC villians are as low as level 4.  
  2. At the start of Blake's second mission, there is a Clap-Trap you can rescue and earn three more sorely needed backpack slots. 
  3. After defeating MINAC, you get a free level-up which makes your turret even stronger without affecting your XP points. Then you get a "mission" of just going to the Gift Shop, no purchase required. If your XP level was already high enough, you may level up again. 
    You will not want to shop at the Gift Shop yet because it is still the level that the Tartarus loot and enemies were when you started. But the good news is that you can return any time during the rest of the game and the Gift Shop will level up to around your level. 
    So we can return to T-Bone and do all the missions including the Armory, with the difference being that we will not worry about looting it. instead, after we finish up in T-Bone, we will return to the Tartarus Gift Shop which has much better loot than the armory and is infinitely easier to farm.  
    The result is that with almost no exceptions, I am certain to get my most desired loot: Hellfire SMG, Volcano Sniper Rifle, a MOD with +12 (usually higher) ammo regen, a shield with 1200+ damage resistance, and high rate Tranfusion mod and Exploding Longbow mod.

The Tartarus Missions:

Image

The first mission is given by Tannis. You can run through it in a few minutes. Start at mid-left in the picture and follow the yellow path about half way to an open area with a ramp on the other side.

Run on the ramp and take the first right. Go up the ramp and the first Claptrap is in the shed. Turn and jump over the rail, heading south until you can go east. The 2nd is behind a small building. Continue behind it and follow the dashes west.

You'll enter a skag area. Drop a turret and run up the ramp on the left. Continue westerly to a ramp on your sharp right and go up to the top, cross a platform, and take the second ramp down to #3.

Follow the dashes NEasterly until you reach #4 in a pond. Keep going to the small fort where you will hear one of my favorite lines: "Put down your weapons. Hyperion does not want to harm them." Go get #5 and do a save-exit. The destination markers they added to the GOTY version makes it even easier.

When you turn in the mission, Tannis gives another mission which could be done in the Hyperion Dump. Ditto when you turn in the second one and any after that.

You can complete the second one while doing Blake's missions, but after after you turn in Tannis' second and subsequent missions, you probably will have to go back to the Dump to get enough Claptraps.

For Blake's first mission, go down the circular staircase (or just jump over the rail) and wait for Blake to quit talking and give you a mission to meet him, then a door will open and you can follow the map marker to Blake's office.

Blake gives you four missions, one at a time. For the first one, exit his area and turn left then go down the stairs on the left. Bear left. Go up the stairs on the left of the building and jump over the rail at the first landing. Go down the stairs and ramp nearby to a big open area.

Run straight to the marker. Some goons may shoot at you, but with your level 40+ shield, you can just ignore them. Some vids show how to activate turrets to protect you, but we don't need them. What you are getting into is a maze of tunnels, starting on the left side of this picture:

Image

There are multiple paths which criss-cross. Follow the red dashes. If you have Options set to rotate the mini-map, it will be easier to follow this picture if you set mini-map not to rotate. You can turn rotate back on when you get through this map. Click pause, Options, other Options.

When you complete this mission, just save-exit-return, turn in the mission and get the next one from Blake.

For the second mission, just follow the HUD. Stay on the right side of the tracks. Right before you cross to the next area, there are some stairs leading down to a Claptrap to rescue. As usual, you will get three backpack slots when done.

When you come back to turn in mission 2, you'll see that a train has pulled up and dropped off a bunch of
*-Traps for you to kill. Then get mission 3 and do it.

In missions 2 and 3, you can just run past the critters most of the time. The bosses can be hard to beat without getting killed if they are at your level or close to it. If you are following this walkthrough and the bosses have low levels, you can kill them easily. Otherwise...
The first time you fight Clap-Knoxx, turn left and run to the corner. He can't hit you.  
Clap-Steele 1: In the NW corner of the room (to the left of where you dropped in) are 3 large containers side-by-side. Next to them is a stack of pipes which can be used to let you get on top of the containers. From there you can shoot at Steele and she can't get you back. 
Clap-Steele 2: On the opposite side of the area you entered to fight her are two big stone slabs end-to-end. You can climb on top of them, but Steele can't, even though she keeps trying. As above, you can shoot her and she can't hit you.

When you go up against MINAC, your goal is to keep shooting MINAC in the eye until dead.

After MINAC makes his appearance, run south down the paved road (or against the left wall if MINAC blocks the road) until you pass the last bent sign on the left. You should see a red chest to the left. Get in the middle of several big boulders. You may have to jump to get between the main ones, then squat down, popping up to take shots at MINAC.

Once there, MINAC can't hit you when you duck down and the kamikazies can't get to you (which I consider the biggest advantage). Then you just wait for MINAC to come up and expose his eye, then you pop up and shoot. Repeat until it's dead.

The best weapon is a corrosive one. I recently finished a game where I got a Pestilent Defiler revolver at T-Bone Junction. The next game didn't give me a Pestilent Defiler, but I got a caustic rifle with good stats and it was enough to make short work of MINAC.

A game after that the only caustic weapon I could get had bad stats, so I had to use a plain rifle. It took a lot longer, but I was never in danger. Whenever my turret was charged, I would pop it up. Not only would it recharge my health, but it distracted MINAC so that I could take shots at it.

I also used a mod which regens ammo at +13. Since your strategy is to pop up, take a few shots,and duck, +13 is plenty fast enough for reloading. I've used a 6% regen mod with +28% damage. That worked fine as well.

After killing MINAC, you will be attacked by Kamikazies and evil Claptrap himself. Since they can't get to you, they are no problem. Once you subdue him, turn in the mission for a free Skill point plus the key to the "Gift Shop" (room with the red chests).

The Gift Shop

When I go straight to Tartarus from finishing the Armory at T-Bone, I'm usually level 42 and the enemies are around 37. On my first trip to the Gift Shop, the loot goes from level 37 to 42 with the average around 39.

The gift shop does not have as many chests as the armory, but looting them is much faster and there are vending machines in the room where you can sell gear you don't want to keep when your backpack gets full.

After looting and selling gear, I exit and restart to come back at the start of Tartarus. It's annoying to have to run all the way to the gift shop again, but it takes less than a minute and is worth the trip. And unlike the armory, it only takes about 30 seconds to open all the chests.

I usually farm the gift shop around 5 or 6 times (sometimes more). It's common for me to go from around $5 million to $15 million and have a backpack full of the best legendaires.

The main things I'm looking for are a level 42+ Hellfire SMG with a good scope, a Volcano sniper rifle with 500+ damage, a shield with 1000+ damage resistance, and an ammo regen mod of 13+.

I usually already have a transfusion grenade mod and longbow mod, but recently, I looted T-Bone Junction for about $3 million and never got a longbow either looting or from the ammo machines, nor did I get one from the armory, nor from doing the Tartarus missions nor from 10 runs at the gift shop, so I went back to T-Bone and couldn't get one, then to Underdome and on the 20th try, finally got one but with only about 30 damage, which is probably too weak for grenade jumping.

In today's effort, it took at least 10 replays to get a Hellfire which rarely takes that long. The good news is that by then, I had already picked up and sold tens of millions of dollars of gear, a shield with 1500+ damage, a 750-damage Volcano, a +18 Regen mod, better longbow and transfusion grenades, and more.

The Hellfire can set fire to fully armored and shielded enemies as well as big bosses. The scope lets it be used as a sniper rifle as well as for close-up work.

When I was leveling up to 60, the enemies were always as much as 3 levels ahead of me. Every time I leveled up, I went back to farm the Gift Shop for upgraded versions of my gear, which I needed because the enemies leveled up too.


T-Bone Junction Missions

At L43 with a fully loaded turret and a level 37+ weapon, I can do the Big Crimson Brother mission. There is a bot to destroy close to the Bounty Board, so I go towards the bot, deploy my turret, and fire my weapon at the bot to get it airborne. The turret instantly destroys it.

After I complete a round of looting ending in saving and exiting, the bot is reset, so I can repeat the above each time until the mission is complete. If you prefer, there are other bots around to destroy, but there is no hurry.

Getting to Moxxi is pretty straight-forward, then exit and return to home base. The only thing that's semi-tough is when those bands of killer women crash land and come after you. I drop a turret and use my best automatic weapon since it's hard to get a single shot weapon to hit them.

Some times I'll just run back to my car and use its guided missiles to kill them.

Prison Break: Follow the map markers to get to the map below. Before you go through the way point (before the map below), there is a C-A-R place on the left with vending machines where you can restock ammo and sell gear. Then get a Racer to replace your Monster.

Image

After you go through the barrier, take the first exit, keep going mostly straight as shown with the red dash. You'll come up to a ramp which is used to go through a round opening onto the elevated road.

The Monster car could not make the jump through the hole in the barrier, which is why I would get the Racer, but my first try with the Racer in the GOTY version, it jumped above the hole. Now I don't hit the turbo to get through the hole until I'm going up the ramp and I ease off it when I see I'm going to make it.

Once through the hole, take the first left where you see another ramp. Back up as far as you can and jump the ramp. If you hit the wall instead of jumping into the prison grounds, exit the Racer and walk around the wall to the right and you'll reach an opening. Fight your way to the door and go in.

Follow your HUD markers until you get to a hole in the floor which goes down to Shank. After the cut scene, activate your turret and shoot him with an electric or caustic gun. When the turret goes away, keep running circles around the room until it's ready again, then repeat. Eventually you'll kill him. Don't forget to pick up the teleporter!!

You'll come across a ClapTrap to rescue, but it's a lot of trouble and if you do it, there is no backpack bonus that you usually get, so I skip it.

Even though I'm at L43 and the bandits are L37 and my shields and weapons are twice as strong as theirs, I have been killed many times in the prison. One main spot is right after you go past the Clap Trap needing rescue. Continue across the room and up the stairs. First you have to kill a bunch of bandits and then a couple of badass brutes with rocket launchers. Good fun.

When you get to Athena and give her the teleporter, don't just save/exit. Walk towards the door until a big box comes up showing that the mission was completed, then you can save/exit back to home base.

If you are in a hurry, you can just run through everything until you get to Shank, then continue running the rest of the way.

Missions:

Core Collection: I skip this because the cores cause more trouble than they are worth. They make finding good gear to pick up harder with the cores mixed in, and the most frequent core - electric - pulses so that if you get too close to a barrel, it blows up.

The Bitch Is Payback: Kill a couple of guys for Athena. You don't even have to get out of the car. Go to the map marker then activate target locator ("A" on the Xbox), and start firing missiles through gaps in the walls. (This requires a Monster car.)

Activate the Bridge: After you activate the bridge, don't leave the area to go to the bridge until you get a box saying that it's done.

After crossing the bridge, while on your way to the armory, you can do the Knoxxed Out and Payback 2 missions:

The open area where the women attack has the first Echo for Knoxxed Out. After getting a car, go left and off the cliff to drop down to where the marker is for the 2nd Echo.

The 3rd Echo and Commander Ajax are in the same area close to where you are. Exit left from the area you're in and take the first hairpin right turn to get to the entrance to the area for the 3rd Echo.

Your car can't fit through the entrance, so just sit there and fire guided missiles to clear out all the enemies. This will also kill Ajax. Run in and pick up the 3rd Echo.

Leave Knoxxed Out as the current mission and follow the markers to the last two Echos, then continue on to the armory.


Athena's Bomb (looting the armory):

I rarely find much in the armory worth having. If you take the elevator down (which starts a countdown clock) instead of using the glitch that lets you go through the floor without starting the clock, you won't have time to check every chest, so the odds of finding anything worth keeping are low.

But on my last trip, I used the glitch and checked every chest and still got little worth keeping.

So I no longer loot the armory. I just take the elevator down and complete the mission. I've already done the Claptrap DLC so now I can farm the Gift Shop which is much easier to loot and usually has better loot than the armory.

If you want to loot the armory, look for a video and follow it.


Farming the Tartarus Gift Shop

If you followed this walkthrough, you did the main Tartarus missions after getting to around level 40+ and looting T-Bone Junction. The exception is that we did not farm the Gift Shop because its loot is at a very low level until you finish the T-Bone Armory mission.

Now that is done, we can return to Tartarus and farm the Gift Shop as described earlier.


Story Missions

When done at Tartarus, go back to Fyrestone and continue its missions. If there are any missions you don't enjoy, you now have the luxury of skipping them since neither the cash nor the XP rewards are significant compared to what you already have.

I usually just do the story missions the rest of the way to the vault, and you can run past the enemies in most of those missions. If you got the Mine Key earlier, you can quickly kill Sledge (2 shots from the turret) and then you are cleared to leave Fyrestone.

Having finished the DLC's, it is back to the main story missions. The page linked lists the story missions with side mission indented after them.

Road Warriors: Bandit Apocalypse is the last mission in Dahl Headlands. There is a trick to never getting hit which makes this easy. See this video at minute 3.00. I've always used this to survive. But with the gear and level we have now, we can drive on in and mix it up. One time I left the car on the ramp and after running in far enough to get the gate closed, I moved to the left edge of the area and one-shot each of the bandit cars with my level 42 Hellfire SMG, so that was fun.

Seek Out Tannis

Here are several tips which I've never seen online. The first is when you get into her general area, for some reason people keep going straight, circling arount to the left, and having to fight a bunch of spiderants the whole way.

But look to the left when you first enter the area and you'll see a white-ish wall with 3 rakks hanging down above it. In the original BL1, that wall could be scaled (after killing the rakks) by jumping onto a pointy rock about 1/3rd over from the left, then jumping onto the ledge about half way to the left end, then jump to the left where the wall ends, but in the GOTY version, I can never stick that last jump.

However, once on the ledge, I can face right, throw a longbow grenade onto the ledge, and jump. It's a lot easier than the alternative and a chest at the top even gives you a grenade back. If you don't have a high shield rating, it's possible the grenade can kill you, so you might want to get a low-powered longbow mod to use.

Image

Tannis sends you to Crazy Earl's.

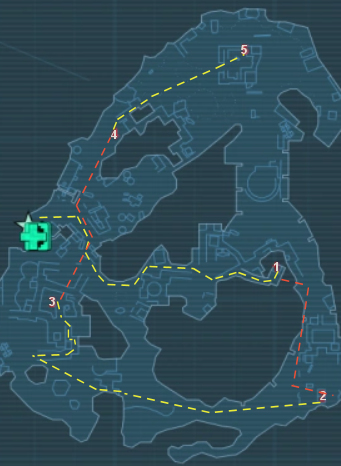
Here's the best/easiest way to get there: assuming you haven't been in that area yet.

From inside Tannis' place, save-exit-reload to get back to the Underpass Fast Travel station just outside Tannis' area. Get a car and go through the Rust Commons East waypoint (top-left of the picture).

Follow the red dashed line to the southern (bottom) Rust Commons West waypoint where the two stars are side-by-side.

Go past the first Catch-A-Ride and turn north to the Outeryard Catch-A-Ride/Fast Travel station.

From there, it's an easy walk to Earl's waypoint. After this, you can use Fast Travel to get to Earl's.

Note that when it's time to go to Jaynistown from New Haven for the first time, the best way is to fast travel to Outeryard, get a car, go back through the southern waypoint at the bottom of the map, and go straight to the bridge and then to Jaynistown.

Next...

After a few self-serving missions, Earl finally tells you that Krom has the missing piece.

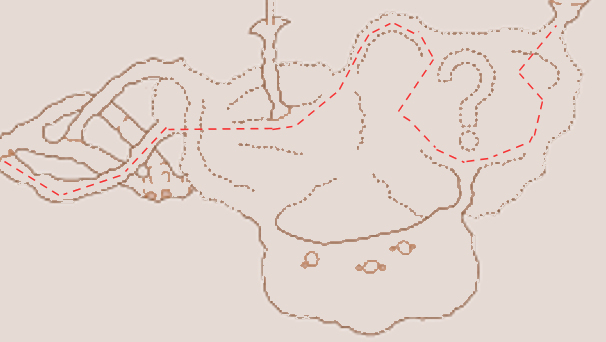
Krom's Canyon is reached by going through a heavily guarded area past a flood gate on the northern end of Rust Commons East. After passing through the fenced area, there is small wall you can get behind and snipe a couple of turrets.

Then jump down and cross the water to a jump up behind some boulders. (It may take a few jumps.) From there, another turret must be sniped. Then just run to Krom Canyon's waypoint. No bandits get anywhere near you.

After you get through the waypoint, turn right and run towards the elevated walkway. Go past the first stairs on the right and go up the stairs/ramp to the walkway, cross it and go up the stairs and continue going through camps until you can't go any further, then cross to the left side of the canyon, snipe any bandits below, drop down, and enter Krom's area. This route avoids all the spiderants.

A map marker shows you where Krom is. Get behind a big boulder in the center which you can shoot over to snipe Krom until his turret explodes. Then it is easy to work your way up to the top to complete the mission. Save-exit-return to the start of Krom Canyon and fast travel back to Tannis.

Jaynistown has a ton of bandits. I just go in guns blazing until the screen says that I've killed Jaynis Cobb. Turn in the mission to Taylor Cobb, make a trip back to New Haven, then return to Jaynistown to kill Taylor Cobb.

Killing Taylor is even easier. When you enter the opening, bear left around the building in front of you and run between a couple of buildings and through a gap in a tall fence to get to an area with two buildings each with a turret on top.

Cross the area, go to the left of the left building, throw out the turret (angle slightly to the left) and wait for it to do its work, then when the screen shows you killed Taylor Cobb, save-exit-reload to get back to the start of the area.

Rakk Hive: From there, run back to where the map marker shows ClapTrap is. He lets you into a large area which ends with the Rakk Hive. You can just run past all the spiderants along the way and when you get to the Rakk Hive, activate your turret and start shooting the monster in his eyes with a Hellfire. Killing it doesn't take long, then complete the mission and return to Tannis.

Not Without My Claptrap:

Image Old Haven is another area that used to eat my lunch. The turrets and the never-ending supply of Lancers was just too much.

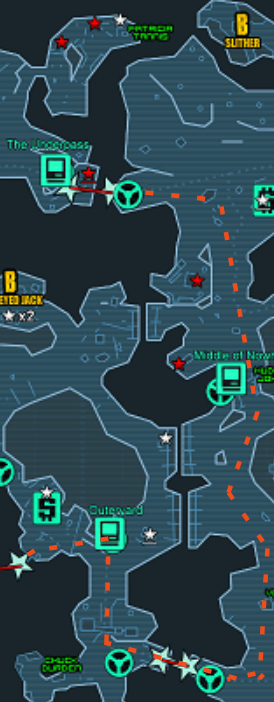
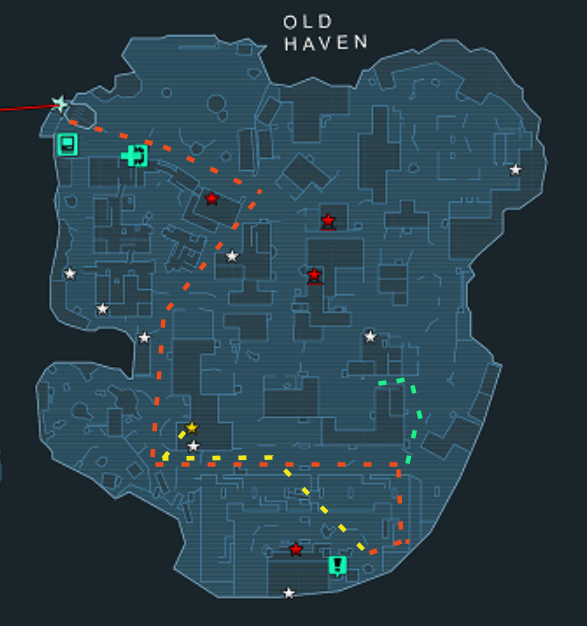
Now I just run down the orange path from the top-left to the bottom right where Claptrap is being held. When you get to the first star on the map, turn right, go to the back of the building and up the stairs just past the next star. Then follow the map marker to turn off the first smoke stack.

Come back to the orange path and take the next right to an area which has the 2nd smoke stack at the far end. Go back and follow the orange path to where it turns left.

That area has a turret on each side. Slow down enough to blast them. Jump down into the ditch come up the stairs near the back-left, throw down the turret, turn off the smoke, free Claptrap, and take the yellow path out.

Duck into a building where Claptrap is laying on the ground. Check him and then turn around and go back across the orange path and branch left when at the green dashes. Where those dashes end are some stairs. Go up the stairs and jump across to the next building which has a room on the right with the repair kit.

Grab the kit, jump down by the stairs, and go back on the green and orange and yellow paths to get back to Claptrap. Fix him and save-exit. Note that Claptrap will not be there until after you free him.

The Final Piece:

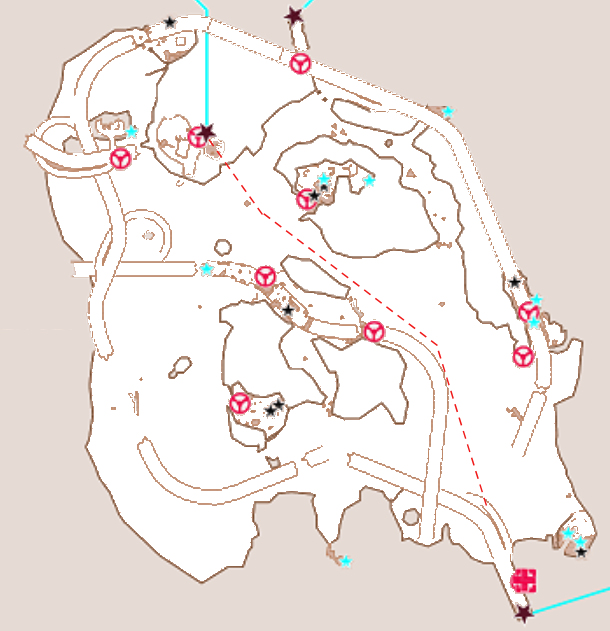
The save-exit-restart from above leaves me inside the start of Old Haven. Fast Travel back to New Haven to turn in the mission, then Fast Travel back to the Underpass, get a car, go back like you are going to Old Haven, but take a left when you get there to get to the entrance to Salt Flats.

Bear left to get to the map marker and destroy four bandit cars. From that area you can see the back of Flynt's area. Park there and scale the rocks to the left to get into the area. The elevator is down the ramp across from where you get in.

After riding the elevator up to see Flynt, get off on the left and bear left to get to a building with some boxes. Climb to get on top, first dropping the turret to keep the bandits entertained.

From there, you're safe from attack. Put the turret on the edge of the building and aim it in Flynt's general area. Eventually, he (and everyone else) dies. Go up to fetch the Final Piece.


Vault Farming (GOTY version)

After killing the Destroyer, 7 chests appear. The middle one has a legendary at your level. I always quit and start a new game, but if you keep going, you may want to farm for other legendaries.

The routine is to travel to Underdome, sell off gear if you want, save-exit-reload, travel back to the Vault and the chests have reset. The bad news is that it tends to repeat the same legendary you got the first time.


Playing On...

For the first time in the million or so times I've played BL1, I decided to keep going after killing the Vault monster, using the option to replay the game from the start with the gear and level I already have.

Since the Vault farming was a disappointment, after I fixed the med machine in Fyrestone, I went to Tartarus to do its missions and fight MINAC again and farm the Gift Shop for some upgraded gear

The bottom line is that MINAC took a lot longer to kill, even with a backpack full of legendaries that I didn't have the first time. Over 3-4 Gift Shop runs, I got one or two items to keep, but nothing earth shattering.

I finished the game at level 47.5 and finished Tartarus at 48.5. The enemies and the loot levels in the Gift Shop was about 37 to a couple of level 47 items.

After finishing the second run-through, you can keep playing wherever you want, but there is not an option to do all the missions again. The main advantage is that all your enemies will be at your level or higher so that you can level up.

For example, I was at level 48 and went to Bone Head's. Everyone there was level 48-51. When I leveled up to 49, the enemies went up to 49-52, etc.

My strategy is to use a mod that adds 23% or more XP when XP is earned. My main weapon is a Hellfire SMG. I start by killing the skags across the street so that they don't come up behind me later.

I then move towards the path to Bone Head's. Some bandits will come out of the path. Usually some skaggs will come across the ditch. I set out my turret facing them and continue shooting the bandits.

With all that cleared up, I go down the path to Bone Head's, stopping at the start of the ramp on the right. Sometimes Bone Head will come out of a shack on the rack and walk towards the end of fence in front of him When he gets gets close to a barrel, I shoot it to damage him.

If he doesn't come out of the shack, I use the scope of the Hellfire to look for him at the far end of the area. I fire a few shots to get him coming towards me, then set out my turret and run up the ramp.

I follow the elevated walkway around as far as it goes, which is just past a gap that must be jumped over. From there, I can snipe at bandits with the Hellfire. When it gets down to Bone Head and one or two other bandits, I jump off the walkway and move to the opening in the fence.

I set out the turret and join in firing at BH and any remaining bandits, ducking behind the fence if my health gets low.

If BH came out of the shack on the left and you fired at him and ran up the ramp, it's possible that the door covering the game in the fence will not get opened. If that happens, there are some boxes you can climb on to look over the fence and snipe.

Once everyone is dead, I enter the compound and pick up loot and then exit and restart.

Back in Fyrestone, if I have leveled up, I go to the Tartarus Gift Shop and farm it 3-4 times to try for higher level loot. It only takes 15-20 minutes total and one good item is more than worth it. While I'm at it, I loot any ammo that I'm short on.

If I didn't level up, I get ammo from the chest in the building with the ammo machine, then top off my ammo at the machine. I could use the ammo regen mod instead, but the ammo is so cheap that it's not worth the time.

I keep going after Bone Head until I get tired of it. I can always come back to him later to repeat.

In the course of farming BH dozens and dozens of times, I tried out every highly recommended weapon in addition to the Hellfire, so I had plenty of opportunity to see which weapon was the most effective, and it was always the Hellfire.

Farming MINAC:

Back in Tartarus, you can follow the route to get to MINAC. To do that, I had to kill the 3 bosses first, and they were 2-3 levels above me and there was no way to run away and snipe them, so I had to get killed several times for each one in order to build up their damage enough to kill them.

MINAC was the worst. If I popped up and fired once or twice, he could knock out my shield with one shot and my health with another, while my couple of shots did very little to him. I eventually killed him, but it took a long time. So I went back to Fyrestone and continued to farm Bone Head for XP.

When I got to level 60, I took a crack at Crawmarax who was 2-3 levels above me and had minions to make matters worse. The glitch in the original version doesn't work in the GOTY, so I got absolutely nowhere and just gave up and went back to Bone Head.


New Ways to Play

When I first started playing with both exploits (XP & Money), after doing the T-Bone and Tartarus missions, I was mainly just playing the main story missions because you don't earn much money or XP for killing enemies who are at a lot lower level nor do you gain much for doing such missions.

To me, trying to gather the best gear in T-Bone and Tartarus was a lot of fun, but for the rest of the game, it was also a lot of fun one-shot killing enemies and even bosses who had previously given me a hard time.

Then in a recent game when I came out of the Gift Shop with a 160-damage Hellfire SMG with a big scope, a +16 ammo regen mod, and a shield with 1320 damage resistance, I wondered if I could complete the game with just those three items (plus my turret), and I did. So that was cool.

Trying to finish the game as quickly as I could, I just ran through a lot of missions with enemies bouncing their bullets off my big shield, and, again, I was just doing the main story missions.

This cleansed my palate and the next game, I went back to playing every mission, most of which I had not done in a very long time, so it was interesting to do them again.


Getting Gear

This is a record of the gear we looted in T-Bone Junction before starting the T-Bone missions, then the gear we upgraded with in the Armory, and finally the gear we upgraded with from the Tartarus Gift Shop:

The specs for weapons are

    Damage, Accuracy, Rate of Fire, Magazine Size, Zoom, Element Effect.

I have never liked Repeaters, Revolvers, Shotguns, SMGs (except Hellfire), nor Rocket Launchers. Other weapons do more damage faster and more consistently. A high-powered Pesitilent Defiler isn't bad, especially against MINAC.

Rifles: 

    185, 68, 8.1, 104
      I didn't think this was great at first because of accuracy of just 68, but the damage of 185 for a fully automatic weapon firing 8.1 rounds per minute and the large magazine made it my go-to weapon all the way until I got a Hellfire SMG in the Tartarus Gift Shop.

    68, 94, 10, 12, Chem-x1
      I got this because fighting MINAC in Tartarus requires a chemical weapon, but I kept looking for one with better specs. I ended up using this one, but it took longer to kill MINAC.

    73, 97, 10, 12, Elec-x1
      I got this to use against Guardians, but its damage rating is so low that the plain rifle above did better.

Sniper: 

    295, 97, 0.8, 6, 1.0x, Fire x4. Volcano L34.
      Two games in a row I got this low power legendary while looting in T-Bone. I never got a better one until I reached the Tartarus Gift Shop. But even this is a lot better than having no Volcano.
      Gift Shop Volcano: 605, 98, 0.7, 6, 2.5 x, Fire x4

    435, 93, 2.7, 5, 1x
      This is a no-element sniper, but even with its much higher damage, it's not nearly as good as the Volcano, but it is needed in T-Bone when fighting Pyro enemies who are resistent to the Volcano's fire. A Volcano with 500-750 damage from the Gift Shop can light up even Pyro enemies and I can get rid of non-fire weapons.

Grenades: 

    Transfusion 83 damage.
      In the Armory, got a 111 damage. 
      Two good things about Transfusion grenades: (1) They home in on multiple enemies and (2) they return health to you.

    Longbow 89 damage
      I used this mainly for genade jumping. But I got a 117 in the Gift Shop. I kept both.

Mods: 

    13 Ammo Regeneration
      3 Bonus features and +36% Magazine size. 
    Shield: 786 damage resistence, 109 recharge rate.
      In the Armory, got a 958, 134.
      In the Gift Shop, got a 1218, 224

Hellfire SMG: L43: 135,90, 12, 55

Gift Shop:

    Ideally, I'm normally looking for the following if I don't already have them: 
    • Hellfire SMG (65+ damage, 6+ rate, 12+ magazine, 1.5x zoom)
    • Volcano sniper (650+, 97+ accuracy, 6+ magazine, 1.5x zoom)
    • Shield (1200+)
    • Mod: +13 ammo regen. Or 8+ regen with +25% mag or +20%+ dam.
    • Grenade: 111 damage Transfusion, 89+ Longbow explosion.
    • I'll take a Pestilent Defiler, but wouldn't go out of my way for it.

    Each time I loot the Gift Shop is a "run". When done, I save-quit-restart and do another run until I get what I want. I used to only have to do 5 runs. Recently it's been 10 or more. I give up after 20. I may come back after doing some missions if I feel like trying again.

    The numbered lines below show the run number to get an idea of how it all pays off.

    Weapon specs: damage, accuracy, rate of fire, magazine size, elemental rate

    Sept., 2024: 

      2. Volcano: 425, 97, 0.9, 6, 1x zoom, level 43
           Shield: 1092, 138, level 40
      3. Glo.Havoc: 165, 89, 12.1, 72, 2.1x level 37 

    Oct. 22, 2024: 

      1. Mod: +31% Electrocute with +24% Chance (L34)
      2. Shield: Damage: 1495, Recharge: 155
      3. Hellfire: 112, 83, 8.3, 46, 3.9x, Fx4 (L43)
           Sniper: 307, 98, 1.1, 6, 2.4x, E1 (L37)
      4. Pestilent Defiler: 646, 97, 1.3, 2, 4.2x, C4 (L43)
      6. Volcano Sniper: 513, 97, 0.8, 3, 2.7x, F4 (L43)
      9. Volcano Sniper: 500, 99, 0.9, 6, 2.7x, F4 (L43)
        I'm using the 500 damage with twice the magazine (6 vs 3).
       
    Oct. 23, 2024: 
      4. Shield: 998 damage resistance, 138 recharge rate.
      8. Volcano sniper: 584, 9.3, 0.8, 3.1x zoom
      9. Mod: Electric damage increase: +48%, +33.% chance of causing damage.
      12. Longbow: 117
      17. Hellfire: 125, 91, 6.9, 55, 4.3x, level 43.
      18. Defiler: 684, , 93, 1.9, 2, 4.2x zoom, chem-X4 

    July 19, 2025: 
      I haven't updated this in a while, but I have changed what gear I'm using:
      Rifle: Glo.Havoc: 173, 80, 10.6, 54, 1.4x, +52% recoil reduction. No elemental effect.
        Fully auto with a large magazine.
        I got a mod with +36 damage, +3 impact, and 11 ammo regen.
        This is even more powerful than the Hellfire and can be used to snipe.
      Revolver: Defiler: 3.9, 95, 1.3, 6, 4.2x, very high C4. Good against MinMac. SMG: Combustion Hellfire: 197 (very high damage), 93, 4.2, 18, 3.9x, high F4.
        I got two Hellfires with about 150 damage before getting this one, all within runs 6-10.
      Sniper: Volcano: 726, 98.6, 0.6, 3, 2.4x
      Mods: I have just been getting a couple of different mods with the main one being an
        ammo regen for 11 and up. I recently realized that several other mods are very
        worthwhile and can easily be swapped out as needed.
        Today I got these: Those that don't mention a weapon work with all weapons.
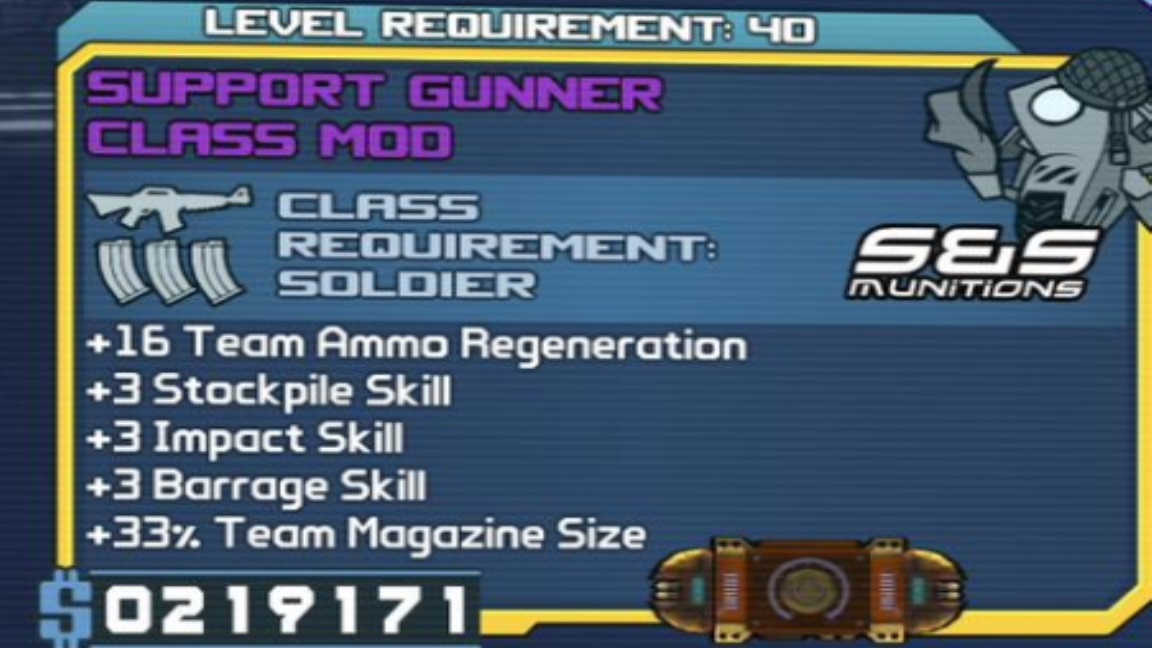
          +18 Ammo Regen. with +3 Stockpile, +3 Impact, +3 Barrage, +52% accuracy.
          +39 Rifle Damage with, +2 Assault, +3 Overload, +2 Impact, 165% recoil reduction
          +50% Mag size, +3 Impact, +2 Overload, +46% fire rate.
          +36 Electrocute damage. I swap this in when fighting things which don't like elec.

          In T-Bone, I maxed out ammo magazine sizes.


        See the best starts for these games: 
        Fallout 3 
        Fallout New Vegas 
        Fallout 4