- Save Source (Ctrl-S)
- Save Source As
Save Web Page
- Restore Original Text
- Restore Before Last Save
- Restore At Last Save
Recent Files
- TIP: The easiest way to access the HTML menu is to right-click in the code window.
Changing Sizes of Windows:
You can change the widths of the two windows by moving the cursor between them. The cursor will change to a horizontal double arrow. Click and drag the bar between the windows.
The next time you run the CSBB File Viewer, it will remember your screen settings.
- If you say Yes, the changes will be left as made in the source window, but not saved to disk until you click File - Save. If you change your mind about saving the changes, click File - Restore.
- If you say No, the changes in the source will be removed.
- Multiple blank spaces are ignored beyond the first space, so, for example, you cannot use multiple spaces to format text spacing, but as you will see, you can insert multiple HTML codes for spaces.
- Line breaks in an HTML source file are ignored completely. To get line breaks in your HTML page, you must use the Break and Paragraph commands.
- On the other hand, HTML adds unrequested line breaks and blank lines to some commands, such as Headers and Indents.
- First line.
- Second line.
- Third line.
- First line.
- Second line.
- Third line.
- First line.
- Second line.
- Third line.
- This is one thing.
- This is a second thing.
- This is a third thing, but it is
a lot longer thing than the other
two things. But still just gets
one number -- where the <LI> is. - This is one thing
- This is another thing.
This is a line with no bullet. - for all good men
- to come to the aid
- of their country.
The lines above show how to have lines with bullets which are not indented by using <DL>. Compare this again to an indented bullet list using <UL> (below). Whichever you use, these functions should be treated as an insertion since there is no way to highlight text and mix it into code. Bring up the list code first and then fill it in.
Now is the time
- for all good men
- to come to the aid
- of their country.
- (One final indentation.)
Also notice that for each level of indentation, the color/style of the bullets changes (except there appears to be a limit to this in Chrome, et al).
- but this line is really important!
but now back to the blah, blah, blah.The was done with an <LI> code without the <UL>.
 To really draw attention to a line,
put a Diamond (suit symbol) at its start. - If you insert a hard space at the end of a couple of regular spaces, you will end up with 2 spaces because consecutive regular spaces will collapse into one, but if you insert a hard space between two regular spaces, you will end up with 3 spaces because the two regular spaces are no longer consecutivve.
- If you know you will be applying a lot of spaces in a row, or even on different rows, it is quicker to insert one, which also causes it to be placed into the copy-and-paste buffer, then use paste (Ctrl-V) for the others. This tip applies to many other BB File Editor functions such as putting a half line break at the end of a paragraph.
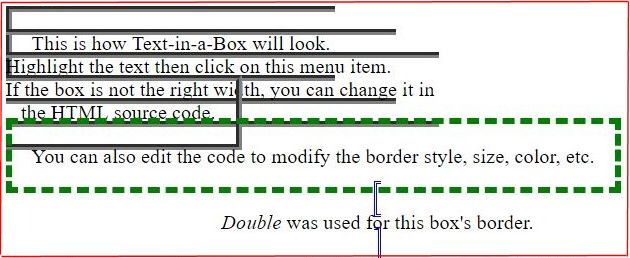
- Another way to insert blank spaces is to insert a transparent image.
At this time, there are four: a 2-pixel image, a 20-pixel image, a 30-pixel image, and a 60-pixel image.
The following shows how these fit in with other types of spacing:
abcd = no spacing.
ab cd = 2-pixel image.
ab cd = regular space (about 5 pixels)
ab cd = space + (about 10 pixels)
ab cd = space + + space (Can't have 2 regular spaces in a row.) (about 15 pixels)
ab cd = 20-pixel image.
ab cd = 30-pixel image.
ab cd = 60-pixel image.
You could resize these images to any size you want using a graphics program or combine them, such as using a 30 and 50 to get an 80-pixel space. (We could have just used a 30+30 to get a 60, but it turns out that 60 was being used enough to justify an image of its own.)
Images can also be used for controlling space between lines. See the Line Breaks menu.
CardShark BidBase
| ||||||||||||||||||||||||||||||||||||||||||||||||||||||||||||||||||||||||||||||||||||||||||||||||||||||
|
The Document Display Windows Disclosure Note Files File Menu
Open File (F5) Open Links/Files in Right Window Close Right Panel (F6) Swap Panels (F7) Change Monitors (Shift-F2) Delete File Edit Menu HTML Menu
Hyperlinks Section Headings Hide Text |
Line Breaks Text Flow Lists
Indent With Bullets Indent Without Break (Selected Text)) Indent Without Break (Whole Document) Bullet List Without Indent Suit Symbols  Insert: Insert:       Suits to Symbols and Undo Make Symbols For Hands Suits to Symbols and Undo Make Symbols For HandsTable
Table (Ctrl-T) Row (Ctrl-R) Data Cell (Ctrl-D) Merge Cells Across Merge Cells Down Align Top / Width Bidding Font/CourierZoom/Swap Images |
Browser Buttons
 --
Resizing The Viewer
--
Resizing The Viewer
Related Help Files:
|
BidBase Editor - Overview
BidBase Editor - Menu System BidBase Editor - Input Boxes |
BidBase BidSim - Bidding Simulator
BidBase Practice Dealer BidBase Notes for Programmers |
Notes:
-
In BidBase documents, double suit symbols are used to indicate either of two suits being bid:
See Suit Symbols, above.
-
3
= 3 Diamonds or Clubs.2
= 2 Hearts or Spades.
The Document Display Windows
-
This viewer displays documents about bids, as well as BidBase's help files. Documents can either be in plain text format (with *.TXT extensions) or in HTML (with *.HTM extensions). Using HTML files allows more flexibility. For example, HTML files can contain links to other Note files or even to web pages, as well as screen shots, colored text, tables, and more.
This viewer has two display panels (or "windows"). With these, you can view two different documents at once or different parts of the same file or the HTML source code for the file in the other window.
For example, if the right window is closed and you click on a link in the left window, such as in the Table Of Contents, the selected part of the same file will be displayed in the right window, leaving the Table Of Contents in the left window for easy future use.
Editing Files:
When you are using a window as a browser, you cannot make changes directly to the file you are viewing. To make changes, you must click Edit - Edit HTML to edit the code for the HTML document that is in the left window. If you want to edit the document which is in the right window, click File - Swap Panels to move it to the left window.
When you select Edit - Edit HTML or press F11, the right window is no longer a browser, it is a text editor. Each time you press Ctrl-S (or File-Save) to save your work, you will see in the left window (browser) the results of your work. To be able to check out features of this program while you read about them, press F11 now to bring up the source file editor.
This is not a full-blown browser. The program is restricted by the capabilities of the browser control which Microsoft provided for VB6. So when viewing pages online, you may get a message saying that not all features could be activated. You can choose whether or not to continue loading the page.
Menu functions related to editing files are disabled until you enter the edit mode.
 Disclosure Note Files
The red diamond identifies information for bridge players.
The Disclosure input box in the BidBase Editor only allows up to 50 characters. If you want to enter longer notes about a specific entry (as opposed to notes about a convention), you must first save the entry, then click on the "N" button on the right of the Disclosure input box.
Because notes for a specific entry are normally much simpler and shorter than notes about a convention, the default is to store them in simpler and shorter text files ("*.TXT") instead of HTM files. (If lengthy notes are needed, they probably belong in the Convention Name note file.)
When you click the button to create a new note file, the file is created on disk. The file name consists of the prior bids, the current bid, the entry's ID# and a ".TXT" extension
(e.g.: 1C-1S_ID1234.txt).
To convert a TXT file to an HTML file, first click on the source file in the right box, then click the HTML menu, and HTML Start-End menu item. Then click File and Save As to save the file with an HTM extension, then delete the original *.TXT file.
File Menu
New File (F4)
-
This starts a new HTML file. A file is created with the name you enter, then when you make entries in the source (edit) window and press Ctrl-S to save, the results are shown in the left window.
If you enter a name to start a new file and then change your mind, be sure to click File - Delete to delete the file that was started; otherwise, it will remain on your drive, junking it up, for eternity!
Open File (F5)
All the convention note files and program help files, etc., are stored in the Notes folder which is, itself, located in the BidBase folder.
While you normally open note files from the BidBase Editor by clicking on a button, this menu option gives you direct access to open any file in the Notes folder. (Or any other web pages on your hard drive, for that matter.)
Loading Web pages online:
While this program is intended primarily for viewing help files on your hard drive (specifically, BidBase help and note files), there are several ways you can get to a Web page.
One way is by putting a link to a Web page in a file and clicking on it.
A second way is to click on the Search globe button.
The most direct way is to type a URL into one of the caption boxes above each window/panel and then press Enter.
However, because this program is not intended primarily as a full Web browser, it will not support some features found in some web pages, such as scripts.
If you did not get the CardShark Bidbase files, you can view them at www.aeyec.com/BidBase. Because all the files there were created with this program, they can all be displayed with it, but most web pages cannot.
Open Links/Files in Right Window
-
Often, when viewing a file in the left window, you may click on links or open new files to view supplementally.
This option will allow you to open new documents in the right window while the original document remains unchanged in the left window.
This will not work while editing a file, but if you have this feature turned on and press F-11 to edit the file, the source code will be shown in the right window in place of whatever is there. Then after viewing or editing the source HTML, you can press F-11 again if you wish and resume opening links in the right window.
To move a file from the right window to the left window, see Swap Panels, below.
Close Right Panel (F6)
-
Lets you close the right window/panel, if it is open. If you are editing a file in the right windows, you can press F11 to close it.
Swap Panels (F7)
-
To edit a document, the original document must be in the left window, then when you click on Edit - Edit HTML, the code is displayed in the right window.
If you have two documents displayed and want to edit the document which is in the right window, Swap the two first to put the desired document in the left window.
When you are viewing a document in the left window while editing its HTML code in the right window, if you click on a link, it will open the new document in the left window. However, it will not load the new document's code into the right window under the assumption that you will usually be reloading the original page in the left window.
If you decide that you want to edit a new document which you have loaded into the left window, press F11 and it will be done.
If you then want to return to the document originally in the left window, click File and you should find it in the list of recent files at the bottom of the menu;.
Change Monitors (Shift-F2)
BidBase File Viewer initially comes up on the primary monitor.
Windows 10 lets you move apps to different monitors by holding Shift-Win and tapping Left/RIght arrows, or you can snap windows to the edges of a monitor by holding Wind and tapping L/R and continuing to tap to change monitors.
The BidBase function to change monitors in File Viewer by pressing Shift-F2 sitll works if you can't or don't want to use the Windows function.
Delete File
Lets you delete the current document. It will only delete the file which is currently being viewed.
If you move an entry from a grid into the Input Boxes, and click on one of the buttons for creating a new note file and then change your mind, if you simply close this viewing window, the blank file you just created will remain on the disk and will show up every time you view the entry.
So if you start to create a new file and change your mind, you should delete it rather than just closing the viewer.
Other than the situation just discussed, you rarely should delete files from the Notes folder.
Save Source (Ctrl-S)
-
Saves changes to the current file. This option only works if you are editing a local HTML or TXT source file that's on your hard drive, since you cannot make changes directly to a web page online.
Save Source As
-
Saves changes to the current file, but to a different file name. Again, this only works if you are editing a local HTML or TXT source file. If you are editing a file and, say, wanted to split it into two, you can save the source under a different name and delete the parts from each file that you want in the other file.
You will be asked if you want to delete the original file. Normally, you would not, but you can if, for example, you just want to change the name of the file. In fact, in that case, you should always delete the first file.
Save Web Page
-
As long as you are reading local documents from your system, you can view or edit the source files by clicking Edit HTML or pressing F11.
But if you are viewing a document on the Internet with this program, you have to save the source file to your hard disk using this menu command before you can edit it.
One use of this feature is if you just want to see how something was done in HTML. The problem is that most web pages these days use a lot of things other than HTML to create web pages and, in fact, may not load correctly when loaded into this program or, when loaded, may still try to access the Internet to get data to display in the pages.
In most cases, it's not worth trying to download Web page source code. An exception are files on our web site (www.aeyec.com/BidBase) since those files were created solely with this program.
Restore Original Text
When editing a file, to see changes in the window on the left you have to save your changes to disk.
If you wish to discard all changes, click File - Restore Original Text and the original file loaded in the current editing session will be restored into the edit window, then you must press Ctrl-S to complete the restore by saving it to disk.
If you change your mind about restoring the file, simply exit this program without saving and the last save you did make is what will show up the next time you load the file.
NOTICE: If you exit this program or load another file or if you use the browser buttons to display another file, your changes will be set and you will not be able to Restore.
Restore Before Last Save
Everything in the section above about restoring the original text applies to this menu option, except that instead of restoring the original file, this function will restore the file as it was prior to the last time you saved.
After you save, if you continue to make changes, you can discard unsaved changes with the next function, so this function discards the last changes saved.
Restore At Last Save
This option discards changes made since the last save.
Here is a recap of the three restores:
Say you load a file with just the following text in it:
- 1. H <---(Original text.)
Then you add some text and save it:
- 2. Hello <---(Before last save.)
Then you add some more text and save it:
- 3. Hello World <---(Last save.)
Finally, you add more text but don't save it:
- 4. Hello World, how are you? <---(Unsaved)
Restore Original Text and you get:
- 1. H
Restore Before Last Save and you get:
- 2. Hello
Restore At Last Save and you get:
- 3. Hello World
These Restores only restore to the edit window. You must save the restored text (press Ctrl-S or click File - Save) to make the change permanent.
One More Restore:
Press the customary Ctrl-Z to restore your last change. Unlike other programs, you cannot keep pressing Ctrl-Z to restore changes prior to the last one. For deeper restores such as that, we have the ones described above which, as far as I know, makes this the only program to offer them.
Print and Print Preview
-
You can print all or part of a file you are viewing. Use Print Preview first to see what it will look like. Unlike a typical Web page, if there is something you don't want printed - say, a space-consuming picture - you can bring up the HTML and remove it.
You'll have to save your change to disk to have the change take effect, but when you are through printing, you can click on Restore Before Last Save to get it back.
When you click on Print, you get the standard Windows printer control box first. One of its features is to be able to print just a Selection, which is created by clicking and dragging over the desired part of the file in the left window (NOT the HTML source code).
Recent Files
-
Up to the 10 most recent files opened, including any Web pages, are displayed in the Recent Files list in the Files menu.
Due to menu space constraints, the paths are saved but not shown. For purposes of BidBase, the path should usually be to the Notes folder, but you can open files in other folders as well.
Click on a file name in the Recent Files list to load it.
Edit Menu
- When you are just reading a file and not editing it, HTML editing options are disabled. When you select the next option, they will be enabled.
Edit HTML (F11)
-
With a local HTML file (i.e.: not a page on the Web) displayed in the left box, this option lets you edit the source code for that file in the right box. If the source file is already being displayed, then clicking this again closes the right box.
If you are viewing a page which is on the Web, you will get an error message if you try to edit the HTML code. You must first save the HTML code to disk using File - Save Web Page. This will save the HTML code (when possible) and then display it in the right edit window.
HTML on the menu bar and the Restore functions on the File menu don't function until you click to edit a page.
Find/Replace (Ctrl-F)
To find text in a document, click in the document's text and press Ctrl-F. To find text in a document's HTML source code (assuming that the source code is displayed), click in the source code and press Ctrl-F or click Edit - Find.
Find and Replace text functions work the way they usually do in Windows, with a couple of exceptions.
You can choose to ignore text in angled brackets ( < > ) in order to prevent accidentally altering HTML code when doing a Replace All.
If you do any replacements, then when you exit the Find/Replace window, you will be asked if you want to save your changes.
Make Table Of Contents
-
After you have completed a long HTML file, this menu option can automatically create a Table Of Contents for the file. Doing it manually can be a long, arduos task, the more so the longer the file since you have to page back and forth through the file from the TOC to the place where the link goes, so having the program do this chore for you is a blessing.
Normally, the title of the document, such as "Jacoby 2N", is marked as a header with "<H1>" on the left and "</H1>" on the right.
Throughout the document should be sections with H2 headings and those might be broken into subsections with H3 headings.
This function copies those H2 and H3 headings to the front of the document to create a Table of Contents with internal links back to the sections.
Wait until you have completed the file to perform this function. Once you have run this, any additional sections will have to be manually added to the TOC and linked. Deleting the TOC will not remove the link codes in the sections throughout the document. That must be done manually.
HTML Menu
Introduction
While we refer to the code in this program as "HTML", some traditional HTML codes have been replaced by CSS codes and some HTML codes are no longer supported by the latest browsers. The FONT command, in particular, which was used for changing colors, font size, type faces, etc., is no longer recommended for use.
If you are just creating pages for offline use, such as for documentation for programs, then it is not a problem because the web browser provided by Microsoft for programmers, such as the one used by BidBase File Viewer, still supports old HTML code.
This program makes creating Web pages pretty much effortless. Just pick the options you want from the menus. Not only does this give you all the basics, but as you will see in the following, it gives you many advanced options which even some seasoned HTML users may not know how to do.
As a last resort, if you want to do something in HTML that this program doesn't do or if you are having trouble using one of the things it will do, just Google "How do you do [whatever] in HTML?"
A couple of quirks of HTML --
An exception is when a TXT file is displayed in a browser, the spaces and line breaks are all used.
Another exception is when you use HTML's PRE command, after which text is displayed just as you enter it (i.e.: PRE-formatted). This will all be delved into below.
Terminology:
Mostly there are two kinds of HTML functions here: (1) those that just insert a code, such as entering a line break or paragraph mark (insertion), and (2) those that work on selected text, such as text to be made bold or indented (wrap-around).
It really doesn't seem necessary to explain how to select text in this day and age when you see babies in strollers playing on cell phones, but just to be thorough, the instructions follow, but we hid them for you to bring up when some "expert" isn't around to see you. Just
click here.
For insertions, just click where you want the HTML to go, then right-click to bring up the HTML menu and select the function you want. You may wish to repeat some insertion commands, such as inserting an HTML space, several times in a row. For that reason, such commands are stuffed into the keyboard buffer and you can repeat them by using the standard Ctrl-V keyboard function.
For wrap-arounds, highlight the section you want the HTML to apply to and then select the HTML feature. The program will put the necessary HTML at the beginning and end of the selection.
Either way, more complex HTML code will also include brief instructions and examples. Just delete those out when you get the code working for you.
In the sections that follow, the page you see on the left will be referred to as the Web page, (even though the primary purpose for BidBase is to create pages for offline reference), while the page on the right will be called the source page.
And speaking of Web pages, all the code in the BidBase File Viewer works fine in the Viewer, but may not work in Chrome and its ilk, especially when they make changes to those browsers all the time. For example, in the Viewer, the "Close" prompt in the Hidden text above can be centered by simply using the <CENTER> command, but in Chrome, that command just messes things up, so we had to leave it out.
In fact, in the hidden text code, we can't even using things like
- <div style="text-align:center;" or
<:span align="center"
The HTML menu comes to you:
When you are editing a source page, instead of having to move the mouse cursor up to the menu bar, you can just right-click on the source window and a floating HTML menu will appear near your cursor.
HTML Start-End (Ctrl-H)
-
This puts the starting and ending HTML code in the file. This is the first step in creating an HTML document, though if you already have text you want in the file, you can add this starting and ending code at any time.
For complete control of where text is word-wrapped, this command also creates a Table in which everything in the body of your document should go. A <CENTER> command is put before the Table command. When the browser window is enlarged, the document will stay centered.
The centering of the document can be affected by some other elements. One is that if you set the Table and TD width to a fixed number of pixels like 850, but you have some element like a picture that is wider than 850 pixels, only the picture will be centered. All the text will have wider margin on the right by the extra width of the picture.
If you want to insure that you have a left margin, you can put one or more <UL> commands or a margin command in place of or in addition to the CENTER command before the Table command.
If you do not want to put everything in a Table, you can delete the Table commands and, if you wish, use the margin commands instead.
The Table code will look like the setting on the left:
|
<TABLE WIDTH="90%"> <TR><TD> |
<TABLE WIDTH="850"> <TR><TD WIDTH="850"> |
All the text for the page comes after this. The end of the file closes the table.
Say that you have a monitor with a width of 1920 pixels. Pages which are mainly text are only comfortable to read at about half that width, but the 90% setting will make the text stretch out to as much as 1700 pixels. Normally this would only happen after you have widened your browser window for a wide Web page and then brought up a page like this one which should be much narrower.
You could resize the browser window again, but that gets to be a nuisance.
The alternative is to set the table width to something in the 850 range, as shown in the setting on the right, so that text will always wrap at that width no matter to what size you make the browser. Of course if someone wants to make the browser window really narrow, the text will not resize down, but that is not a problem which comes up very often.
The exception to the "always wraps" is that some elements, such as pictures, may have a fixed width and cannot wrap to the set width, so they just extend beyond the margin and you have to use the scroll bar to see all of the element. Or you can widen the browser window which may let you see the whole element, but other elements, such as paragraphs of text, will continue wrapping at the set table width in which they reside.
The No-Break line is an element which can cause a line to extend beyond the width of the browser (though normally it is only used to keep a couple of words together). If the table that everything goes into is set at 90%, then when the No-Break line or any other non-wrapping element extends beyond the browser width, every wrapping element will also extend to that width, making a mess of your document.
With the Table width set to something like 850, you get a comfortable text width and even if you make some text No-Break, it will not affect other text.
Finally, if you set the table width to 850 and put CENTER before the table command, but you have one picture in the document which is wider than 850 pixels and you don't want to shrink and you don't want to keep the whole document centered (*whew*), you can end the document's main table before the picture and start a new table after the picture.
Colors
Page Colors lets you change the colors of text, the background, and links for the entire document.
See Text Colors and Text Background, coming up next, for changing colors for selected text.
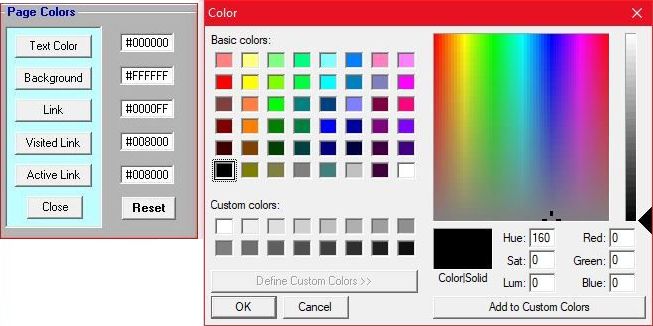
The color numbers are just shown for reference. When you select a color, the change will immediately be made to the Web page. The Reset button restores all the original colors.
______________
Text Colors lets you change the color of specific text. Just highlight the text, select this option, and pick a color. Then press Ctrl-S to save and view the results.
______________
Background-Text Colors lets you do this:
- Red light means stop.
Green light means go.
Yellow light means go real fast.
- (From the 1984 movie Starman.)
Also see Yellow Highlighter under Text Emphasis, below for quick and easy highlighting.
______________
The Color Code option lets you select a color with the color picker, then it inserts the color code into the source where you last clicked.
If you are replacing an already existing color code, first highlight it (by double-clicking it) before clicking on this menu option. However, if you forget, you will have two color codes and can just delete the old one.
Header1-3 (H1/H2/H3)
This is wrap-around code. First highlight the header text, then select Header1, 2, or 3. Or you can insert the header commands and type your text into them.
Header1 is the largest and would normally just be used for the file title, so it is automatically centered.
Header2 is used for major headings and Header3, for sub-headers, such as the one above.
Header4 is about the same size as regular text, so rather than Header4, you just use Bold to highlight the desired text.
Header5 is too small to be considered a header.
Note that headers are automatically offset from the preceding and following text, so the use of Break and Paragraph commands around them are not required, but they don't hurt anything either. Breaks can be used to split headers over more than one line.
Link Internal (Ctrl-L)
You can use Internal Links to jump from anywhere to anywhere else in a document. The Table Of Contents uses this, but you will also see words highlighted and underscored indicating that you can jump somewhere for more information. The document should say whether the user is jumping to a different document or to somewhere within the same one.
First highlight the text you want to jump from and press Ctrl-L. You will be prompted to click on the point in the file you want to jump to, then press Ctrl-L again.
The program will look for the first unused link code, starting with "A", and use that to link to the jump destination. If the destination already has a link code because more than one location is jumping to it, when you click on that point in the file to jump to, be sure to click on the code that is already there so that the program will reuse that link rather than create a new code for the same point.
After inserting the link code, if it looks okay, press Ctrl-S to save it and click on the link to test it.
Link External (Ctrl-E)
BidBase File Viewer is intended for reading and creating HTML and text files on your local hard drive. The Web browser in this program is one provided by Microsoft for programmers. It does not have all the capabilities of the latest Web browsers such as Chrome and thus is unlikely to work with most Web pages.
So if you are creating a file to be used offline with this program, linking to a web page is not recommended; but if your file is expected to be accessed by people using Chrome, etc., whether online or off, you can link to other web pages online.
To use this function, first highlight the text you want to link to a new page, then press Ctrl-E (for External link).
A standard Windows box will open for selecting a file from a local drive. To link to a Web file, Cancel the file selection box and the link code will be inserted into your document. Put the Web address between the quotes in the inserted code.
Hide Text
Hide Text Until Clicked
-
Hmmmm. I wonder what this is all about?
Click here if you really want to read all the boring details about hiding text.
What if I'm clicking on malware or something.
But then again, it could be an exciting adventure...
Really Hide Text
If you want to leave a comment in the source code without it showing in the Web page or if you want to disable a section of HTML code without deleting it, you can do these things with this wrap-around function.
Highlight the text and click this menu option.
It will place <!--- and --> at the beginning and end of your selection to hide it until you remove the markers.
And remember that although your hidden text won't show up on the web page, people can easily bring up the source code (even in Chrome) and see hidden text, so watch what you say.
Paragraph (Ctrl-P)
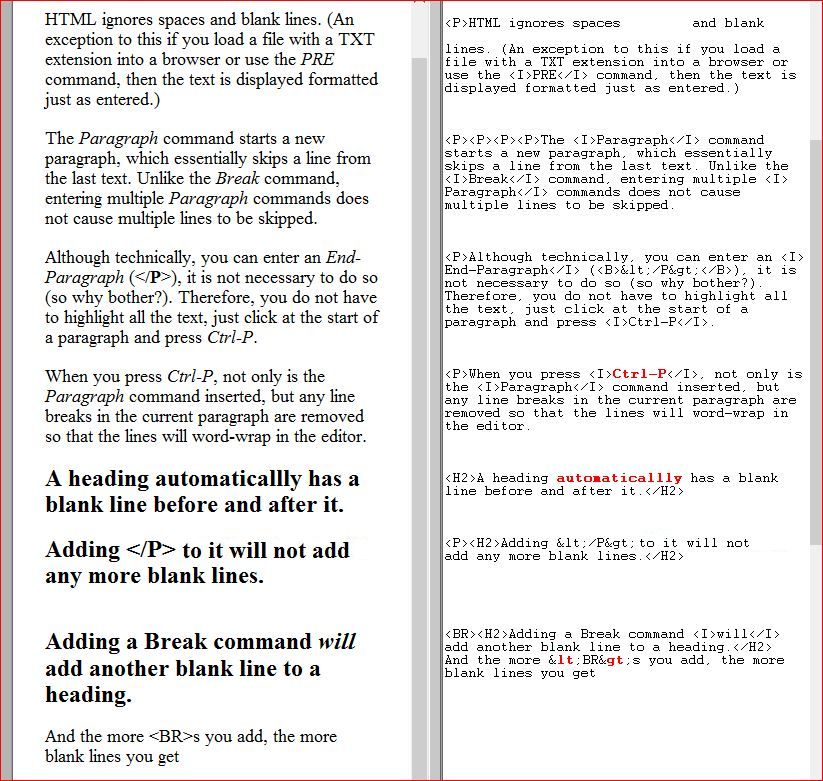
HTML ignores spaces and blank lines. (An exception to this if you load a file with a TXT extension into a browser or use the PRE command, then the text is displayed formatted just as entered.)
The Paragraph command starts a new paragraph, which essentially skips a line from the last text. Unlike the Break command, entering multiple Paragraph commands does not cause multiple lines to be skipped.
Although technically, you can enter an End-Paragraph, it is not necessary to do so (so why bother?). Therefore, you do not have to highlight all the text, just click at the start of a paragraph and press Ctrl-P.
When you press Ctrl-P, not only is the Paragraph command inserted, but any line breaks in the current paragraph are removed so that the lines will word-wrap in the editor.
Click here to read more about the paragraph markers.
Half-height Line
Why a half-height line?
|
With with no line spacing:
(Ugh. too close together.) |
With full line spacing:
(Yuck. Too far apart.) |
With half-line spacing:
(Mmmm. Just right!) |
The line below this one just uses a <BR> to start a new line with no break.
A Superscript tag adds a half-line space above its line to make room for the superscripted text. We can use this to get a half line above the second line by just adding a Superscript tag
around the HTML code for a blank space.
That way, you get the blank half-line without any raised text such as above this line.
To use this function, click where you want the code inserted and select the Half-line Break Above or Half-line Break Below menu items.
Here is how various HTML codes affect the half-line code:
Line 1
<BR>Line 2 - no spacing between lines
____________________________
Line 1 <SUB> </SUB>
<BR>Line 2 - half-line spacing between lines
____________________________
Line 1
<P>Line 2 - full space between lines
____________________________
Line 1 <SUB> </SUB>
<P>Line 2 - space-and-a-half between lines
____________________________
Half-height Line - All
Use this function to change Paragraph line height for the whole document.
Like other functions which work on the whole document, this inserts code in the HEAD section at the start of the document, so look there to modify it. you can change the line height to whatever you want.
Spacing Lines Where You Want Them
By combining paragraph and line break commands and a couple of other tricks, you can get any degree of spacing that you want.
This is the space you get above a line by starting it with a <P> or <BR><BR>.
This is the space above (none) by starting with just <BR>.
This line starts with <BR> and has a half-line break above it (see above).
Starts with <BR> and has a 1x30 pixel blank image in it creating space above it.

Again, this is the space <P> adds.
This line starts with a <BR><P> - the same as just <P>.
This line starts with a <P><BR>.
A line starting with <H#> adds space above and below the line and makes the text bold.
This line starts with <BR> to show the space the H4 line above added.
And so forth. Note that a 1x30 pixel image creates space about midway between the half-line break and a full paragraph break. The image is transparent space so it works with any color background.
Break (Ctrl-K)
-
If you have
several lines
one after the other,
browsers ignore the
line breaks and put
all consecutive lines
of text on the same line.
(See the source code for this paragraph.)
Break causes the text following it <BR>
to start on the next line rather than being appended to the same line.
Two Break commands are the equivalent of one Paragraph command (see the source for the start of the next paragraph), but unlike the Paragraph, you can add more and more blank lines by inserting additional Break commands.
The exception is that if you put a Break command before a Paragraph command, you will not get an extra space. These commands are, in effect, two Breaks in a row. So to get extra space, you have to put 3 Breaks before a paragraph command. But at least you will get an extra space, as opposed to putting multiple Paragraph commands together.
Break is an insertion command; you do not have to highlight any text before pressing Ctrl-K. Just put the cursor where you want the Break to come.
No-Break
No-Break can be used to keep a line break from happening anywhere you don't want it to. Select text to be kept together and use this option.
The first line of this paragraph does not have words all the way to the right marginThat's because the words to be kept together are marked as No-Break.
Typically, you would use this only on a small amount of text you want to keep together near a line break, particularly for hyphenated word(s) which you don't want split, but to illustrate the command in a way which could be seen on a variety of browsers and magnifications, a larger number of words (those which are italicized) was selected.
Center
Select the text to center and click the menu or as always, you can insert the code and type the text into it.
Pre(formatted) Text
If you have a lot of text you want to appear
      just the way you have typed it --
broken into lines and
      indented, etc. --
you can   highlight   the lines and click on
      HTML - PRE.
Look what happens to the font, though. In order to keep things formatted the way you had it, a fixed-width font is used, which will look noticeably different from the rest of your text.
However, you do not have to settle for that ugly font.
  By clicking on
          HTML -
              Text Emphasis -
                  Font
   You can change the look,
           Although  you   may   lose the fixed spacing for every character.
Fixed font: you may lose the fixed spacing for every character.
First add your preformatted text, then add the Font commands. While the commands may throw your preformatting off in the source file due to the space used by the commands themselves, they will not throw off the spacing in the document (unless you change to a non-fixed font).
Superscript and Subscript
Here are examples of subscript and superscript:
Drink plenty of H20 or you will B2dry.
Notice that these functions change the spacing between lines.
It's less noticeable if there is a blank line above (super-) or below (sub-) it.
Drink plenty of H20 or you will B2dry.
Even if you make the the numbers smaller, they still take up another half-line in the BidBase File Viewer, but in Chrome, in the line above, the small font does with SUP save space but the SUB command with a small font does not.
Wrap-Around Images
Highlight the text you want to wrap around the image, then select the Wrap function. Code such as that shown in the red frame (but not broken into lines as shown) will be inserted at the top and <div style="clear:both;"> well be placed at the end.
If the text goes beyond the length of the image, it expands back to normal width and no ending code is needed. In that case, you needn't highlight the text, just click where you want the image to start and then delete the ending code.
But if you want the wrapping text to stop short of the end of the image, the ending code will be needed where you want the text (or any other elements) to stop wrapping.
Enter the file name and path in place of YourImage.jpg. Use the height and width to adjust the size of the image.
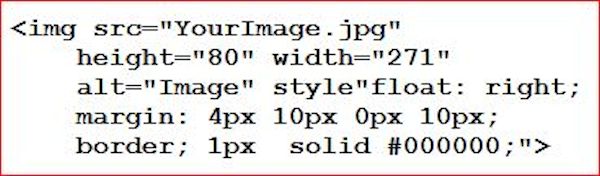 To find the height and width of the image, find the file in the Windows File Explorer, click on Properties, then on Details and near the bottom should be the Width and Height of the image.
Alt is text to display if the image can't be found or won't display. Style="float: can be set to "right" or "left". The margins adjust the space around the image, starting at the top and going clockwise.
Border: 1px solid #FF0000; sets the width and color of the border. You can use the Color Code function in the Colors menu to change the color. After you insert and fix up the code, you can experiment with the various settings until you are happy with the results.
If you want a paragraph and the top of the image to start on the same line instead of the first line of text going over the image as above, put the image wrapping code first and do not put a paragraph or line break, etc., at the start of the text paragraph. Also change the 4px to 0px to eliminate the top margin.
If you are using the BidBase File Viewer/Editor, view your web page in a browser such as Chrome by finding your file in File Explorer, right-clicking it, and clicking on Open With. You may find that it doesn't appear the same due to differences in font size or display size.
Numbered List (Ctrl-N)
-
A numbered list looks like this
HTML automatically numbers each line which starts with <LI>. (If you are using the Bidbase Viewer, press F11 to bring up the HTML code for this file to see how the above is done.)
While some HTML codes can be added to existing text by inserting them or by highlighting the text for them to wrap around, Lists and Tables are easier to handle if you insert the HTML first, then type into it.
Indent With Bullets
-
This causes all text to be indented down to where the Indent is closed.
Just as with Numbered Lists, you don't get a bullet unless you start a line with <LI>. This means that if you just want to indent a paragraph or a whole section of text (like the section you are reading now), keep the <UL> codes but delete the <LI>.
Also, if you look at the source code for this section, you will see that just as with a paragraph, you do not have to close the List command with a </LI>, but you MUST have a </UL>
Sometimes the Indent command inserts a blank line before the list starts, although it is not doing it in the list above, for whatever reason.
In fact, we have never been able to figure out why HTML adds a line sometimes but not others, but if it does add a blank line, there is no way to remove it, which brings us to the next menu item -
Indent Without Break - Selected Text
Since the Indent HTML command may automatically add a blank line before the indentation which you cannot get rid of,
| the Indent Without Break actually uses a Table where the first column is left blank and all the indented text is put into the second column. |
Keep in mind that in a table, the Break, Paragraph, and other formatting commands can be used to format multiple paragraphs or lines of text within a single table cell.
| In fact, when this programs starts an HTML file for you, it creates a table into which all the other content of the page goes to allow better control of margins. |
Notice how the table approach gives control over the amount of indentation simply by changing the width of the first (blank) column.
| See the source code for this file to see exactly how this is done. Also notice that you can create a right margin by setting the table width to a smaller number than the page width. |
Indent Without Break - Whole Document
The indent commands, such as <UL>,
- often add a blank line,
but sometimes they don't.
This function goes at the start of the file and will result in NEVER getting blank lines before <UL>.
When you do want a blank line, it is easy enough to press Ctrl-K and get one.
Bullet List Without Indentation
-
Now is the time
Using Bullets As Attention-Getters
Most of this text here is blah, blah, blah,
To make it look more like a bullet in the margin.
- See the source code for how /UL and UL are used.
Special Characters
Hard Spaces
If you enter more than one space in HTML, they are collapsed into one space (except for in PRE -- see the space around "highlight", above), just as it collapses multiple lines of text into one paragraph.
If you want to actually add more than 1 space, click on HTML - Space.
Using (HTML code for a space) multiple times in a row is another way of indenting text.
"<" and ">"
-
While it is possible at times to enter "<" and ">" into your text and have it work, it is a bad practice because you can never be sure when it will cause problems down the line. That is because these symbols are used to enclose HTML code (e.g.: <BR> is the HTML Break code).
So instead, click on "<" or ">" to insert the HTML code for these symbols rather than entering the actual symbols.
 Card Game Suit Symbols
You can insert the symbols for Clubs: , Diamonds: , Hearts: , Spades: Diamonds/Clubs: and Hearts/Spades: by using this menu or by using Ctrl + the Function keys F1 through F6.
The reason for the double-suit icons is that many bridge conventions operate on the "minors" () or the "majors" (). The bid of 1 or 1 (or 1) over 1 or (or 1) usually has the same bidding requirements no matter which of the alternative suits is bid.
If you don't like the size of the icons, you can just type in a number from 1 to 5 (largest to smallest, matching the size of Headings) after the suit letter in <IMG SRC="C3.png">. For example,
|
|
|
|
|
|
|
|
|
|
|
|
|
|
|
|
|
|
|
|
|
|
|
|
|
|
|
|
|
|
 C1
C1 D1
D1 H1
H1 S1
S1 DC1
DC1 HS1
HS1 C2
C2 H2
H2 S2
S2 DC2
DC2 HS2
HS2 C4
C4 D4
D4 H4
H4 S4
S4 DC4
DC4 HS4
HS4 C5
C5 D5
D5 H5
H5 S5
S5 DC5
DC5 HS5
HS5 Suits to Symbols and Undo
-
In creating a file, you can enter bids as "1C", "3H", etc., then use this menu option to change the suit letters to suit symbols such as "1
" and "3".
If text has been selected (e.g.: 1D-1H-2D), this menu option will work only on the highlighted text; otherwise, it works on the entire file at once.
The program attempts to insure that a substitution doesn't take place in the middle of a link (which would keep the link from working).
If a substitution occurs in the middle of a Heading, a larger graphic is used which should be equal to the font size, but if it is not the same size because of system video differences, you can change the size as by selecting the suit and size, such as H2, and pressing the suit's key, such as Ctrl-F3 for Hearts. This will toggle through the sizes, but you have to Ctrl-S to save to see the results of the change.
An unusual layout may result in an inappropriate, undesired substitution, so after doing this change, look over the file to make sure that everything appears the way it should. If it doesn't, you can edit small problems in the source code, but for really big problems, you may want to select the Undo menu option or even Restore an earlier save.
Make Symbols For Hands (Ctrl-M)
-
Makes
-
K432-AJ53-T874-3
K432 AJ53 T874 3.Just highlight the hand, press Ctrl-C to copy it in case you change your mind, then press Ctrl-M. If you want to put it back the way it was, it will still be highlighted in the HTML code page so you can just press Ctrl-V to paste it over the change.
Suit symbols are stored in individual PNG files (S3.png, H3.png, etc.) in the Notes directory. If you wish, you can replace those files with some of your own choosing.
Table
Table Specs Window
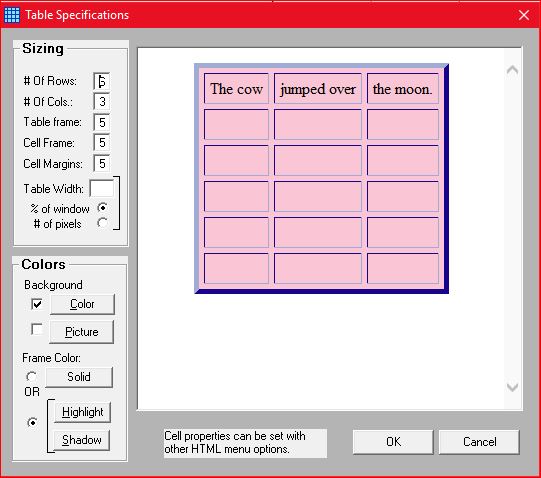
The menu options further down allow you to set specific elements of a table. You would usually use those when you have already started the table.
The best way to create a new table is to use the Table Specs Window, which lets you set and preview many different table parameters at once.
If you have the HTML source file open now so that the HTML menu items are enabled, you can click on HTML - Table - Table Specs Window now to see what it looks like. (Spoiler Alert: It looks like the picture above.)
For BidBase's note files, we normally just use tables to format text on the screen and do not use fancy options such as frame colors, borders, picture backgrounds, etc. However, those options are available in case you wish to use this editor for creating non-BidBase HTML pages.
The following is from the web site of a very famous bridge player.
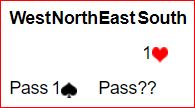
The table width and/or column widths were probably made too small causing the headings to be jammed together and the question marks to appear to be after "Pass" when they were meant to be asking what is the bid for South. Here is what it would look like just by increasing the table width:
Better but columns are not centered:
|
Best with the columns centered:.
|
Table (Ctrl-T)
| Tables let you structure the layout of text on the screen like the Table of Contents in this file. | If you already have text or data which you want to put into a table, highlight it, and press Ctrl-T. | Next you will want to start a Row. (See next section.) |
Row (Ctrl-R)
-
Highlight the text inside the table which you want to put into a row and press Ctrl-R.
Next you will want to start a Data Cell.
Data Cell (Ctrl-D)
-
Highlight the text in the row which you want to put into a <TD>Data Cell</TD> and press Ctrl-D.
All the text in a row must be divided into Data Cells. If text is not put in a Data Cell, it will appear at the start of the table like this:
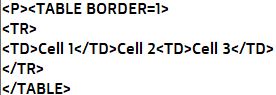
| Cell 1 | Cell 2Cell 3 |
Merge Cells Across
| The quick brown fox jumped | over the wall. | The quick brown fox jumped over the wall. | |
This insertion function lets you span across a specified number of columns. Then just fill in the cells. As you can see by looking at the source code, you omit cell specs for however many additional columns you are going across. While this grid is set up with 4 columns, the TD spec for the 3rd column sets ColSpan = 2 so it takes up the last 2 columns. So only 3 columns (TDs) are defined in the 1st row while all 4 columns are defined, in the 2nd row.
Merge Cells Down
| Going | Going down down down |
As before, you omit cell specs for however many rows you are going down. The first row, above, has 2 TDs (cell specifications going across), the second with RowSpan="3"; the next 2 rows have 1 TD; then the last row has 2 TDs again.
Align Top / Width
-
Put these inside the data cell command (e.g.: <TD Width=80%>).
When you have two columns and one takes multiple lines for a single row while the data in the other column takes fewer lines, the data in the fewer lines is, by default, centered on the lines of the other column.
More often than not, you will want the data with fewer lines to start at the top of the cell, not centered. If so, use the Align Top command: <TD Align=Top>
| This row | shows that if one cell in a row has more lines in it than another cell, the cell with fewer lines will normally be centered on the other. |
| This row | demonstrates the effect of adding the command to align the shorter cell to the top of the longer one. |
If you do not use the Width command, the browser will assign a column width to each column in the table, and the result may not be what you want. If so, use the Width command to specify the width of each cell.
All data cells in the same column must be the same width, so you only need to enter the column width in ONE of the TD commands in the same column.
| This table has a fixed width of 500 pixels. If you reduce the width of the browser, the window size will not change and you will have to use the browser's bottom scroll bar to see the whole table. |
Edit the HTML code for this table to change WIDTH=500 to WIDTH=90%, save it, and see how the table's size will change when the browser's width changes.
Text Emphasis
Font
-
This brings up the Windows font selector for changing font, color, bold, etc.
First highlight the text to apply the changes to and then select this wrap-around option.
Bidding Font (Shift-F12)
Changes bidding from 1C-D-P-1S to 1C-D-P-1S to make the bidding look different from the surrounding text by changing the font to Courier New and making it bold. This is more notable with more bidding text. And since Courier is a fixed font, bidding in columns will line up better.
Font Size
At the start of most of the BidBase Help files, including this one, we enter <FONT SIZE=+1> to increase the size of the text. The reason is that the MS WebBrowser control in this program makes text look smaller than browsers like Chrome and Edge.
If you look at the code for this file, you will notice that the code is placed inside the table in which all the rest of the text for this document goes. That's because usually (if not always), the SIZE command placed outside a table does not affect the print size inside the table.
If that happens, you would need to place the font size code inside each column you want it to affect. This can also be used on a highlighted section of text rather than (or in addition to) the code being used on a whole document. You can also add a COLOR command inside the FONT command's brackets as was done in the line above,, but the SPAN command is normally used for colors because the FONT command is being "deprecated" as they say these days. Note that if your mouse has a wheel, most browsers including this one will let you change print (and graphics) size by holding down Ctrl and turning the wheel.
Bold, Color, Italics, Underline
|