CardShark BidBase Editor
|
 = Diamonds or Clubs.
 = Hearts or Spades.
|
Entry help: To speed up entering hands and Prior Bids, suit and bid letters are automatically uppercased. You can insert a hyphen between suits and between bids by pressing the space bar so you don't have to feel for the 'hyphen' key. When you enter the 13th card of a hand, the cursor automatically advances to the Prior Bids field. When entering Prior Bids, a hyphen is automatically entered after each call though it doesn't hurt to hit the hyphen key or space bar. BidBase does not store passes prior to the opening bid. Instead, a Position field is used to indicate opener's position. The vast majority of bids are the same if an opening bid is made after opening passes and so nothing is entered in the Position field for such entries. When entering a deal with opening passes, try leaving them off first. If no bid is found or if an "incorrect" bid is returned, try it again with the opening passes. |
You can just press Enter while still in the Prior Bids field to find a bid instead of clicking the Find Bid button.
The vast majority of entries do not rely on Vulnerability, but some do. Leave Vulnerability blank unless you think it matters. The same is true of Scoring Method.
If no bid is found and you think that a specific bid should have been made, you may enter that bid into the Show analysis for bid box and you will be told why each entry with that bid fails to meet the specified hand's specs. This includes entries with "x" bids (e.g.: 2x) where there is an "x" in the specified suit's Num box for the entry, but you must enter a suit, not "x". Enter All to see analysis for all entries.
If no bid is found or if you think that the bid found is incorrect, make sure that the entry you think should be used is activated.
If a bid is made which does not agree with the source from which you got the hand and bidding, click the Edit button to have the bid's entry appear in the Input Boxes. Then you can choose to modify the entry so that the hand you entered no longer matches the bid's specs.
If no bid is found for the hand and bidding you entered, click the Add button to add a new entry and the specifications for the hand you entered will appear in the Input Boxes so that you can make a new entry using those specs. Actually, you should try to replace the hand's exact specs with ranges of numbers so that similar hands will also use the bid you enter.
For example, the suit quantities and points of the hand you entered will be exactly as you entered, but often the exact specs for one or more of those suits are not critical. If a suit had 3 cards as entered, you may want to change it to <4 or 2-3 or even just leave it blank if its number doesn't matter for making the bid.
Question: I entered a hand and the prior bids, but it did not find a bid for the hand. What's wrong?
Answer: If no matching bid is found, it is because there is not an entry with specs which match those of the hand and Prior Bids which you entered. All the entries for the Prior Bids you entered will be shown in the grid, and you can use the input box to create an entry for the hand you entered, if you wish.
If no entries show up in the grid, it is because BidBase has no entries for the prior bids you specified. BidBase primarily covers the first couple of rounds of bidding. The further into the rounds of bidding you go, the less likely that BidBase will have entries for your specific prior bids. However, you can still create an entry for those prior bids, even if there are no other such entries.
If you need to add an entry to BidBase so that the bid you want to have made will be made, you may do so, but be sure to read the docs about adding new entries.
Bidding Simulator (F9)
The CardShark Bidding Simulator (BidSim) is a separate program in which you can enter specifications for generating hands which can be used to analyze bidding situations, as well as for analyzing the bidding database.For example, if you have  AJxxx
AJxxx  KJxx
KJxx  x
x  Kxx and RHO opens 1, should you overcall 1 or make a takeout double? It would be nice to know the odds of partner's having 3+ Spade support versus having 4-card Heart support or 5-card Club support, as well as other holdings.
BidSim lets you calculate those odds.
BidSim can be run directly by double-clicking its icon. You do not have to run BidBase Editor first.
For more information, see the BidSim doc file.
Import Practice Deal (Ctrl-I)
When using the BidBase Bidding Practice program, if BidBase makes a call with which you disagree, you can elect to edit they entry which made that bid. The deal and prior bids will be sent to the Editor program, then you bring up the Editor and press Ctrl-I to import it into window for finding a bid for a hand.Once the bid is displayed in that windows, click on Edit to change the specifications for that entry or Add to add a new entry with different specifications.
When done, click on Find to find a bid for the imported hand and prior bids to make sure it comes up with your new/edited entry.
Load/Save System
A "System" is a set of entries in the BidBase database which you have selected to use via the Pct_Used field. After you have made these selections, it's a good idea to save the system you have created. This way, you can save different systems and recall them at will.
The program does not save the actual entries. Instead, it saves the Pct_Used value for each entry. Then when you re-load the system, it first marks all the entries in the current database as disabled (i.e.: Pct_Used set to zero), then it re-enables the entries as indicated in the saved System's file.
The Editor will show you a list of any entries added to the database since you last saved the system. You may go through the list and manually re-enable any of those entries you wish to.
Any entries deleted since the last system save obviously cannot be re-enabled. The program will show you a list of the ID numbers of any such entries, but unless you have a backup of the database from the last save date, you cannot see the actual deleted entries.
If you have changed any entries which existed at the last system save, the program will show you a list of entries whose change date is after the last system save date, but again, it cannot show you the original entries. You would have to look at a backup of the original database.
Another way of saving a system is to simply backup the database (see next section), but then if you restored the backup database, replacing a subsequent database, you would lose any additions, deletions, or changes to the subsequent database.
Backup/Restore Database
You should back up your database periodically if you are editing it at all. As with any other files on your computer, failure to back them up may result in significant loss of your work.Quit Program (and Save Screen Set-Up)
The program automatically saves your screen options so that when you exit the program and restart it, the screen will look the same as it did when you quit. This makes it easy to quit, then resume working later right where you left off.
Edit Menu:
Following are explanations of the Edit menu options:
Activate/Deactivate Entries:
Double-click the Sel column to activate or deactivate all entries in BidBase for the convention.named in the Cnv. Name: Subconv. Name column.
Double-click the Sub (Subcategory) to activate or deactivate all entries for a Subcategory of a convention without deactivating the rest of the convention.
The Pct (Percent Used) column lets you specify how often an entry should be used. It also lets you specify whether the entry is used by We or They. Since it has multiple options, when you double click it, the entry is loaded into the Input Boxes and you can change the Pct there.
The various options will be shown in the white box at the bottom of the screen.
Zap (Delete) Entry (Ctrl-Z) or Empty the Garbage Grid:
Selecting this option (or pressing Ctrl-Z) deletes the selected entry in the grid. The program will ask you to confirm the deletion while showing you the entry's ID#, bid number and the bid itself.
When an entry is deleted, it is moved to the Garbage Grid (see the next section: Restore Entry), from where it can be recovered.
If you have brought up the Garbage Grid and clicked on it and then clicked on Delete Entry (or pressed Ctrl-Z), the Garbage Grid will be emptied of all entries. This should be done periodically to keep the Garbage Grid from getting too large, but do not do it if there is any chance that you will still need any of the entries in it.
Normally, the Garbage Grid is of primary use while in the process of deleting or changing entries. When you are ready to quit the program, or when you start the program next time, you should empty the Garbage so that you can start with a clean slate.
You can, of course, empty the Garbage as often as you like during a single session if you find that it is getting too cluttered.
Restore Entry (Ctrl-R):
Any time you delete or modify an existing entry, the old entry is copied to the Garbage Grid from which it can be recovered if you wish. This feature removes any worries about unintentionally deleting or changing-and-saving entries.The Restore Entry menu item brings up the Garbage Grid where entries are stored which have been deleted or replaced by updated entries.
Click on the entry you wish to restore and press Ctrl-E (or use the Edit Menu option) to copy it to the Input Boxes, just as you would with the main database grid. The most recent entries are at the end of the grid.
Once in the Input Boxes, you can press Ctrl-S (or use the Edit - Save menu) to put the entry back into the database. If you change-and-save an entry, then restore the old one, the changed entry will still be in the database, so if you do not want both entries, delete the one you don't want.
After you copy an old entry into the Input Boxes, the old entry will remain in the Garbage Grid for additional protection until you empty the garbage.
If you save a restored entry and it doesn't show up on the top grid, it is probably because it falls outside the range of entries specified for that grid. Press Ctrl-W to re-set the range to include the restored entry.
If you change an entry and save it, then change and save it again, each replaced entry goes into the Garbage Grid, so you may have multiple versions of the same entry in the Garbage. If you want to restore one of the entries, you will need to study the contents of each entry to make sure you restore the one you want.
To empty the Garbage Grid, first press Ctrl-R (Restore) to bring up the Garbage Grid, then click on the grid, then press Ctrl-Z to delete the contents.
Add Dividing Line (Ctrl-L)
If you look at more than one set of Prior Bids from the database at a time in a grid, you will notice entries with an Order Number of "ZZZZZZ" between sets of entries. (A "set of entries" is a group of entries with the same Prior Bids.)The sole purpose of these "dividing line" entries is to make it easier to see where each set ends and a new one begins when looking at more than one set in the same grid.
You could manually create such dividing entries, but by clicking on a line in the desired set in a grid and pressing F6, it will be done automatically.
Edit Entry (Ctrl-E):
Moves the selected entry in the grid into the input boxes. If you have two grids and an entry selected in each one, it will use the entry from the last grid you clicked on (the "active grid").
Pressing Ctrl-E or selecting Edit Entry does not do anything to the database, so if you press Ctrl-E and change your mind, you can just select a different entry to edit or press Ctrl-K to clear the input boxes. (See below.)
If you press Ctrl-E and change some of the data and save it and THEN change your mind, you can recover the original entry (or any interim changes) from the Garbage Grid. (See above).
An alternative way to move an entry into the Input Boxes is with the mouse. First click on the gray button on the far left of each line.
Once an entry has been moved into the Input Boxes, you will be asked if you are using it as a starting point for making a new entry. If so, it will check the New Entry box. If you say no, then after you make changes and save, the existing entry will be overwritten.
If you overwrite an entry and realize you didn't mean to, you can always click Restore in the Edit menu to recover the original entry from the Garbage grid.
Edit Next Entry (Ctrl-N):
Moves the entry AFTER the selected grid entry into the input boxes. The reason for this is so that you can go down the grid moving one entry after another into the input boxes to view them.
Note that if you press Ctrl-E to edit an entry and then Ctrl-S to save it (or use the menus for the same things), after saving the entry, the program automatically advances to the next record, so you do not have to use Ctrl-N for that, but if you press Ctrl-E and do not save the entry and want to load up the next entry, you would press Ctrl-N.
Use Entry (Ctrl-U):
Many times the bids you enter are similar for different Prior Bids. For example, in third chair, many of the bids after 1C-1H are similar to the bids after 1C-1D.
To make it easier to enter the new bids (for 1C-1H, for example), use two grids and display the existing bids (e.g.: for 1C-1D) in the top window and the 1C-1H bids in the bottom grid.
Select the first bid in the top ("source") grid which you wish to use and click Edit - Use Entry (or just press Ctrl-U or double-click the entry in the grid after clicking on it once to select it). The program executes the following steps:
1. Moves the current entry into the input boxes.
2. Checks the New Entry box so that the entry will be saved as new.
3. Changes the Prior Bids from the source grid to match the Prior Bids in the target grid. (If the target grid has no entries, the Prior Bids specified in the Show/Sort window are used.)
4. Converts suit-specific data from the source entry to the equivalent suit(s) for the target entry. For example, if you are copying an entry with a prior bid of 1H-P to the section with prior bids of 1S-P, then it will change the specification of needing 3+ Hearts to needing 3+ Spades.
Of course, this is a very simple example. When the prior bids are something like 1C-1H-D with a bid of 2D and 1D-1S-D with a bid of 2C, specifications for almost every suit have to be switched around, and the test hand and Distribution Disclosure also have to be adjusted.
The above may sound complicated, but it's nothing you have to know or worry about. Just press Ctrl-U and double-check to make sure that the program has mocked up the entry correctly. Once you get the hang of it, you can duplicate a set of entries for one set of Prior Bids for a similar set of Prior Bids in a flash. (As we shall see later, using the Edit - Compare Entries routine lets you duplicate a set of entries even faster.)
Preview Hand Specs (Ctrl-P)
If you enter a hand in the Enter Your Own Hand input box, you can click the Find button to find a bid for it, or you can click this menu option to display the hand's specs in the Input Boxes.
You may do this if you just want to see an analysis of a particular hand, but it is also a good starting point for creating a new entry if BidBase does not have a bid for the hand you entered.
In fact, if you click Find and a bid is not found, BidBase will enter the hand specs into the Input Boxes for you automatically.
Save Entry (Ctrl-S):
Click Edit-Save on the menu bar or press Ctrl-S. The entry in the Input Boxes will be moved into the correct order on the grid. If you do not see the entry, it may be that the Round, Player, or Prior Bids you entered are outside the range you have specified to display. If you made a data entry error, simply change the entry in the input boxes and save again. (Just make sure that the New Entry box is not checked, or you will have two entries with different numbers.) If the display range needs to be changed, press Ctrl-W and change it.
If you are editing an entry and mess something up, don't save it. You can just press Ctrl-E (or File-Edit) to re-load the entry you are editing into the edit boxes from the grid.
When you save an entry, the Saved box becomes checked. This helps you avoid forgetting to save an entry. When you press Ctrl-E to edit an entry, the Saved box is checked until you change one of the fields and move to a different field, then the Saved box will be unchecked.
The box New Entry lets you easily create a new entry from a similar entry. Just Ctrl-E the old entry to load it into the boxes, then make sure the New Entry box is checked, change the fields you want to change, then press Ctrl-S or click Edit-Save. Your original entry is unchanged, and now you have a new entry.
This is particularly useful when you want to make some minor changes to an existing entry to create a new entry with tighter specs while still leaving the original entry in place.
Clear Inputs (Ctrl-K):
Clears the Input Boxes. This is done automatically when you make any selection which loads an entry into the Input Boxes, so you only have to Ctrl-K when you are creating a new entry from scratch.
For added convenience, there is a button in the Input Boxes section to click to clear the inputs.
Set Screen Colors:
Brings up controls for changing the foreground and background colors for the active and inactive grids, the Input Boxes, and the rest of the window (excluding the status bar at the bottom).
The active grid is the last one clicked on. If you press Ctrl-E or Ctrl-U or Ctrl-N to load an entry into the Input Boxes and more than one grid is visible, the entry comes from the Active Grid. Likewise if you press Ctrl-Z to zap (delete) an entry.
The colors of the Garbage Grid will not change. This is to make it easy to distinguish the Garbage Grid from the other grids.
Compare Entries (F6):
Although Compare Entries is marked in the Table of Contents as being an advanced subject the casual user may skip, it is an extremely important feature for maintaining the consistency and accuracy of the database. For an overview of this subject, see the BidBase Background file.Any time you complete a session of making changes to BidBase, you should compare sections in which you made changes to similar sections. Otherwise, you may, for example end up with one set of specs for 1H-P-2N and completely different specs for 1S-P-2N.
You can compare entries in any similar sets of Prior Bids and in any order of those sets, but being systematic will help avoid oversights. The following is a suggested procedure:
1. Put the lowest ranked suit combination of Prior Bids in the top grid, such as 1C-1D-P. An exception to this is if you have made a lot of changes to another similar set, such as 1D-1H-P, in which case that should be in the top grid and the lowest ranked set in the next grid. Otherwise...
2. Put the next higher ranked set next, such as 1C-1H-P.
3. After comparing those two sections, put the set from the bottom grid into the top grid and the next higher ranked set, such as 1C-1S-P, into the bottom grid. You normally want to compare sets of Prior Bids which are as close as possible in suit rankings because they will have more in common. For example, it is better to compare 1H and 1S Prior Bid entries than 1C and 1S.
4. Always put the set in the top grid which you think is the more correct. However, you may find an entry in the bottom grid which has been updated since the similar entry in the top grid. In that case, you will change the top grid, but you must also go back and change other Prior Bid sets to which you have already compared the top grid.
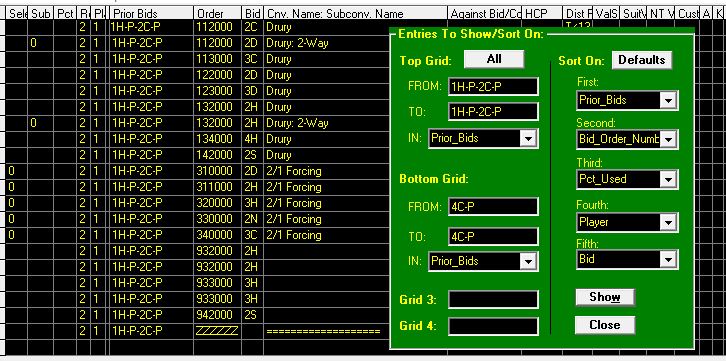
Adjusting Entries To Match:
When comparing entries, if a difference is found, the window above will pop up, making it easier for you to adjust the entries to match. Following is a description of the contents of the window:
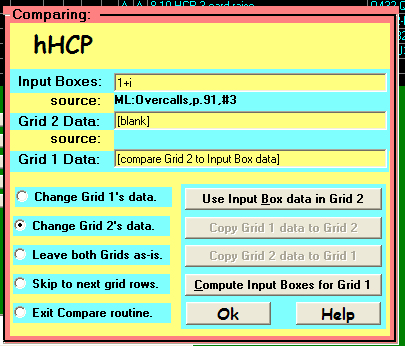
- The heading of the column with the non-matching data is shown first. In the picture on the right, it is hHCP, which is the HCPs specified for Hearts. If you look at grid column headings, you can find this heading.
- Columns in the two grids which contain specs for the hand in general, such as hand Shape, HCPs, etc., can be directly compared. Columns referring to specific suits, such as HCPs for each suit, Test Hand, etc., normally canNOT be directly compared.
For example, if the top grid ("Grid 1") has Prior Bids of 1H-P and the bottom grid ("Grid 2") has 1S-P, then a simple raise for each entry will specify total HCPs of 6-10, but Grid 1 will require 3+ Hearts to raise and Grid 2 will require 3+ Spades.
To be able to compare the two entries, the entry in Grid 1 is used to mock up an entry for Grid 2, just as if you had used the menu option Edit - Use Entry. Grid 2's suit-specific data can then be compared to the data in the Input Boxes. For such suit-specific comparisons, the box for Grid 1 Data will tell you to compare grid 2 to the Input Box data since a comparison to sNum in Grid 1 would be meaningless.
For specs which are not suit specific, grid 1's data will be shown, and it will be the same as the Input Box data. Although grid 1 should normally be the "master" data used to change grid 2's entries, you may sometimes wish to change grid 1's data to match grid 2's. If the Grid 1 Data box shows its actualy data, you can click the Copy Grid 2 data to Grid 1
If you think that the Grid 2 data is correct and you want to change Grid 1's data, click the Copy Grid 2 data to Grid 1 button. You may also directly edit either grid's data if you wish.
If this button is grayed out, it is because you are comparing suit-specific data. In that case, click the Compute Input Boxes for Grid 1. This will cause the entry in Grid 2 to be used to mock up an entry for Grid 1. You can then click Use Input Box data in Grid 1 to put the correct datum into it.
- The top button, Use Input Box data in Grid 2, will copy the data from the Input Boxes field to the Grid 2 Data field and save it to the grid.
- The next two buttons have already been explained above -- when comparing columns which are not suit-specific, you many copy data from one grid to the other.
- The top option choice on the left is Change Grid 1's data. If you make a change to Grid 1's data, be sure this option is selected before clicking Ok. Likewise for the next button.
- The 3rd option si to leave both grids as-is. The program will continue with the next column.
- The 4th option is to skip to the next rows. If you are comparing two entries and decide they just are not comparable, you can skip them.
- The final option is to exit the Compare routine. At times, you may wish to do this to make other changes. For example, if you change Grid 1's data and you have already compared Grid 1 to another set of similar Prior Bid entries, you may want to stop to go back and adjust those entries accordingly.
You may continue Comparing from where you stopped by clicking on the two entries with which you wish to start comparing and then clicking on Edit - Compare.
- When showing you the different data from the two grids, the Source of the entry is also shown. This may help you decide which of the two entries' data to use. The source for Grid 1 is shown as being the source for the Input Boxes.
- The Compare window can be moved by clicking on the top part of it and dragging it around, though it must stay within the main BidBase window.
Some entries may appear to be similar, such as Michaels Cue Bid over 1D and Michaels over 1H, but are not really. Over 1C or 1D, Michaels shows 5-5 in the majors, but over 1H or 1S, it shows 5 of the other major and 5 of an unknown minor. As a result, when these two entries are compared, they will be flagged as not matching.
For two entries to be compared, they must have the same Bid Order Number. The comparison will start with the entries you have last clicked in each grid, so before starting a comparison, click entries with the same Bid Order Number in the different sections.
This also means that when you have an entry which should not be compared to another Prior Bid's similar-looking entry, just give it a slightly different number. For example, over 1C and 1D, similar entries for Michaels should have the same Bid Order Number, while over 1C and 1H, they should not. Then again, Michaels over 1S should have the same numbers as over 1H because they have the same specs: the other major and an unknown minor. If Michaels over 1C and 1D have the number 035000, then you could give the entries for Michaels over 1H or 1S the number 03500M (for Major).
If you change Grid 1's data and you have previously compared the data in Grid 1 to other sets of Prior Bids, remember to go back and change those other sets as well.
You can exit the Compare routine at any time, perform other tasks, such as updating other sections, then start back at the same place (or anywhere else you wish) by clicking on the entries in each grid with which you want to start before click Compare (or pressing F6).
To add several entries from one set of Prior Bids to a similar set, you can click on one entry at a time and use the Edit - Use Entry menu option, but it is faster to Compare the two sections and let this routine add the missing entries. As a bonus, it will point out differences for entries already in both sections.
Test Entries (F7):
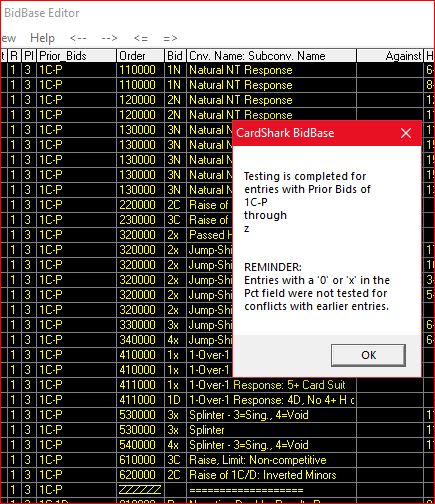
The program will go through the grid, starting with the current row, and test each entry's Test Hand to make sure it matches the entry's specs and that no other entry ahead of it also matches it (unless its Pct_Used field is not blank).
If a Test Hand fails, the entry will be loaded into the Input Boxes, and the test aborted so that you can fix the entry, then start the test again.
When you save an entry and it is tested, you are warned when the test hand matches the specs for an earlier entry, even if the earlier entry is deactivated. This helps avoid problems when you activate the entry later.
However, the Test Hands menu function ignores conflicts involving deactivated entries. This is intentional so that the test will not abort every time a conflicting, but deactivated, entry comes up.
When Test Hands is working, a red box is displayed which says "Testing". When testing a lot of entries, such as when displaying all entries in the database, it is a good idea to let the program test them all, but if you are in a hurry, double-click the red box to abort the test. (You can do this even though the cursor remains an hour glass.)
When testing just one set of Prior Bids, the test will probably finish faster than you can double-click the red box.
Look For Dead Notes (F8):
When creating or editing an entry, if you click the button next to the Disclosure field, it will create a note file for that entry. The file name consists of the Prior Bids, the Bid for the entry, and the entry's ID#, such as 1C-D-1S_ID1234.TXT.If the entry is subsequently deleted or the Bid or Prior Bids fields are changed, the note file will no longer be linked to the entry. BidBase Editor will normally fix such a problem automatically when an entry is deleted or changed, but just to be safe, this test lets you discover and resolve such problems.
If a problem is found, you are alerted, the file is displayed in Notepad, and you are given the opportunity to delete the file.
If you want to keep the file, but change the name to agree with the current entry, you can use Notepad's Save-As feature to save the file under the correct name, then use this program to delete the file with the wrong name.
It takes less than 1 second to check all the entry note files in the Notes folder, so it is worthwhile running this function on a regular basis.
View Menu:
Following are explanations of the View menu options:
From Here Down (Ctrl-B, Ctrl-F)
When looking at a long listing of the database you may get to a point where you no longer want/need to see the entries above the current cursor position. These two menu options will let you remove from view the entries above the grid line you are currently on.Ctrl-F shows "From here down" from the current entry to the end of the set of Prior Bid entries.
Ctrl-B shows "from here down" from the current entry to the bottom of the grid (i.e.: the last entry which you could scroll down to in the grid).
If you have only specified one set of Prior Bid entries for the grid, then both of the above options will have the same result.
To see the whole listing again which you had up before, press Ctrl-W to bring up the Show window, then press Alt-W.
Jump To Next Section (Ctrl-J and <= and =>)
Increments or decrements the section of bids displayed in the grids.When working on the grid, it is normally easier to work on one section at a time. (A section or set of bids are those with the same Prior Bids, such as 1C-P-1H.)
If you are using one grid and viewing the set of bids with Prior Bids of 1C-P-1H, then pressing Ctrl-J or clicking on => will cause the entries with prior bids of 1C-P-1S to be displayed.
If you are using two grids, click => on the menu bar to increment both grids. If you are comparing entries for Prior Bids of 1C-P-P and 1D-P-P, however, and you increment both grids, the top one will have 1C-P-1D and the bottom one will have 1D-P-1H, since 1D-P-1H is the next legal bid after 1D-P-P. To have both grids display the same final bid (1H), you would have to increment the top grid again.
You can use View - Jump (Ctrl-J) to increment only the grid which you last clicked on, so you could click on the top grid (1C-P-1D) and then click on View - Jump (Ctrl-J) to increment it to 1C-P-1H so that both the top and bottom grids would be looking at similar sections.
If you click on <= on the menu bar, the entries on the grid will be decremented.
The sequence used in incrementing is D-R-P-1C/D/H/S/N-...-7C/D/H/S/N. Once a bid has been incremented to 7N, then it will drop back to D and the bid before it, if any, will be incremented. For example, after 1C-P-7N (unlikely but possible), the next set would be 1C-1D-D. And after 1C-7N-P would come 1D-D-R.
Again, for clarification: The <- and -> arrows on the menu bar are for scrolling back and forth through previously viewed sections, which may or may not be in bid sequence order. The <= and => arrows are for bringing up the previous and next sections in bid sequence order which you may or may not have already seen.
Overview - All (Ctrl-O)
Displays the entire database on the grid. "Overview" is a bit of a stretch, name-wise, but "O" was the last shortcut letter not yet used, so we had to work with what we had.If you are going to change the fields to sort the grid by, it's a good idea to select All/Overview first.
Hide Columns (Ctrl-H):
All the fields in an entry probably cannot be viewed on your screen at once because there are too many of them to fit across the screen. The higher your screen resolution, the more records and fields for the records can be seen at once. Or you can stretch the grids across two monitors, if you have such a setup.
If there are some fields you don't need to see, you can click on the column for an entry (NOT on the column heading) and press Ctrl-H to hide it. You can also adjust the widths of columns by putting the cursor on the right edge of a column heading until it turns into a double-headed arrow for left-right, then click and drag.
Unhide Columns:
To unhide columns, click on the View-Unhide menu option and a window will pop up containing drop-down list boxes of hidden columns for the two grids, as well as for the splits of those grids, if any.Simply scroll down the list for the desired grid/split and click on the column you wish to unhide and click the Unhide button. When done, click Close.
Show All Columns (Ctrl-A):
If you have hidden some columns in a grid and want to view them temporarily without having to go through the procedure for unhiding them and then re-hiding them one at a time, click on the grid and press Ctrl-A (or use the View menu option for "Show all cols.".To re-hide the columns you have previously chosen to hide, click on the grid and press Ctrl-A again.
Two Grids (Ctrl-T):
The reason for two grids is so that you can more easily look at two parts of the database at once. For example, you can look at the opening bids in the top grid and responses to the opening bids in the bottom grid.
Or you can look at bids after 1C-1H in one grid and 1C-1S in the other, to compare the responses after the two different overcalls. To make this comparison easier, the far-right scroll bar will scroll both windows at once.
However, we strongly recommend that most of the time, you make the Dupes Grid the second grid.
When more than one grid is visible, you can change the relative sizes of the top two grids by moving the cursor between the two grids. The cursor will change to an up-down cursor, at which point you can click and drag up or down.
Split/Unsplit Grids:
An alternative or addition to using two grids is to split the grid(s) left and right. Then you can hide all the columns you want in the right split while still being able to view and edit them in the left split. Both of the splits will scroll together and of course a change made to one will be seen in the other.
If you hide a column, then split the grid, the column will be hidden in both splits. To hide different columns in each split --
- first split the grid,
- then click on the new split,
- then unhide all the columns in that split,
- then hide the columns in that split which you want hidden.
You can split one or both of the grids, so you can have four views of the database at once. However, while the top and bottom grids can show different sets of records, the left and right splits of a grid can only show different parts of the same set of records.
Press F11 to split/unsplit the top grid, F12 for the bottom grid.
To resize the splits, put the cursor on the dark gap between the two horizontal scroll bars of the two splits (at the bottom of the grid). The cursor will change shape. Click and hold and move the cursor to resize the splits.
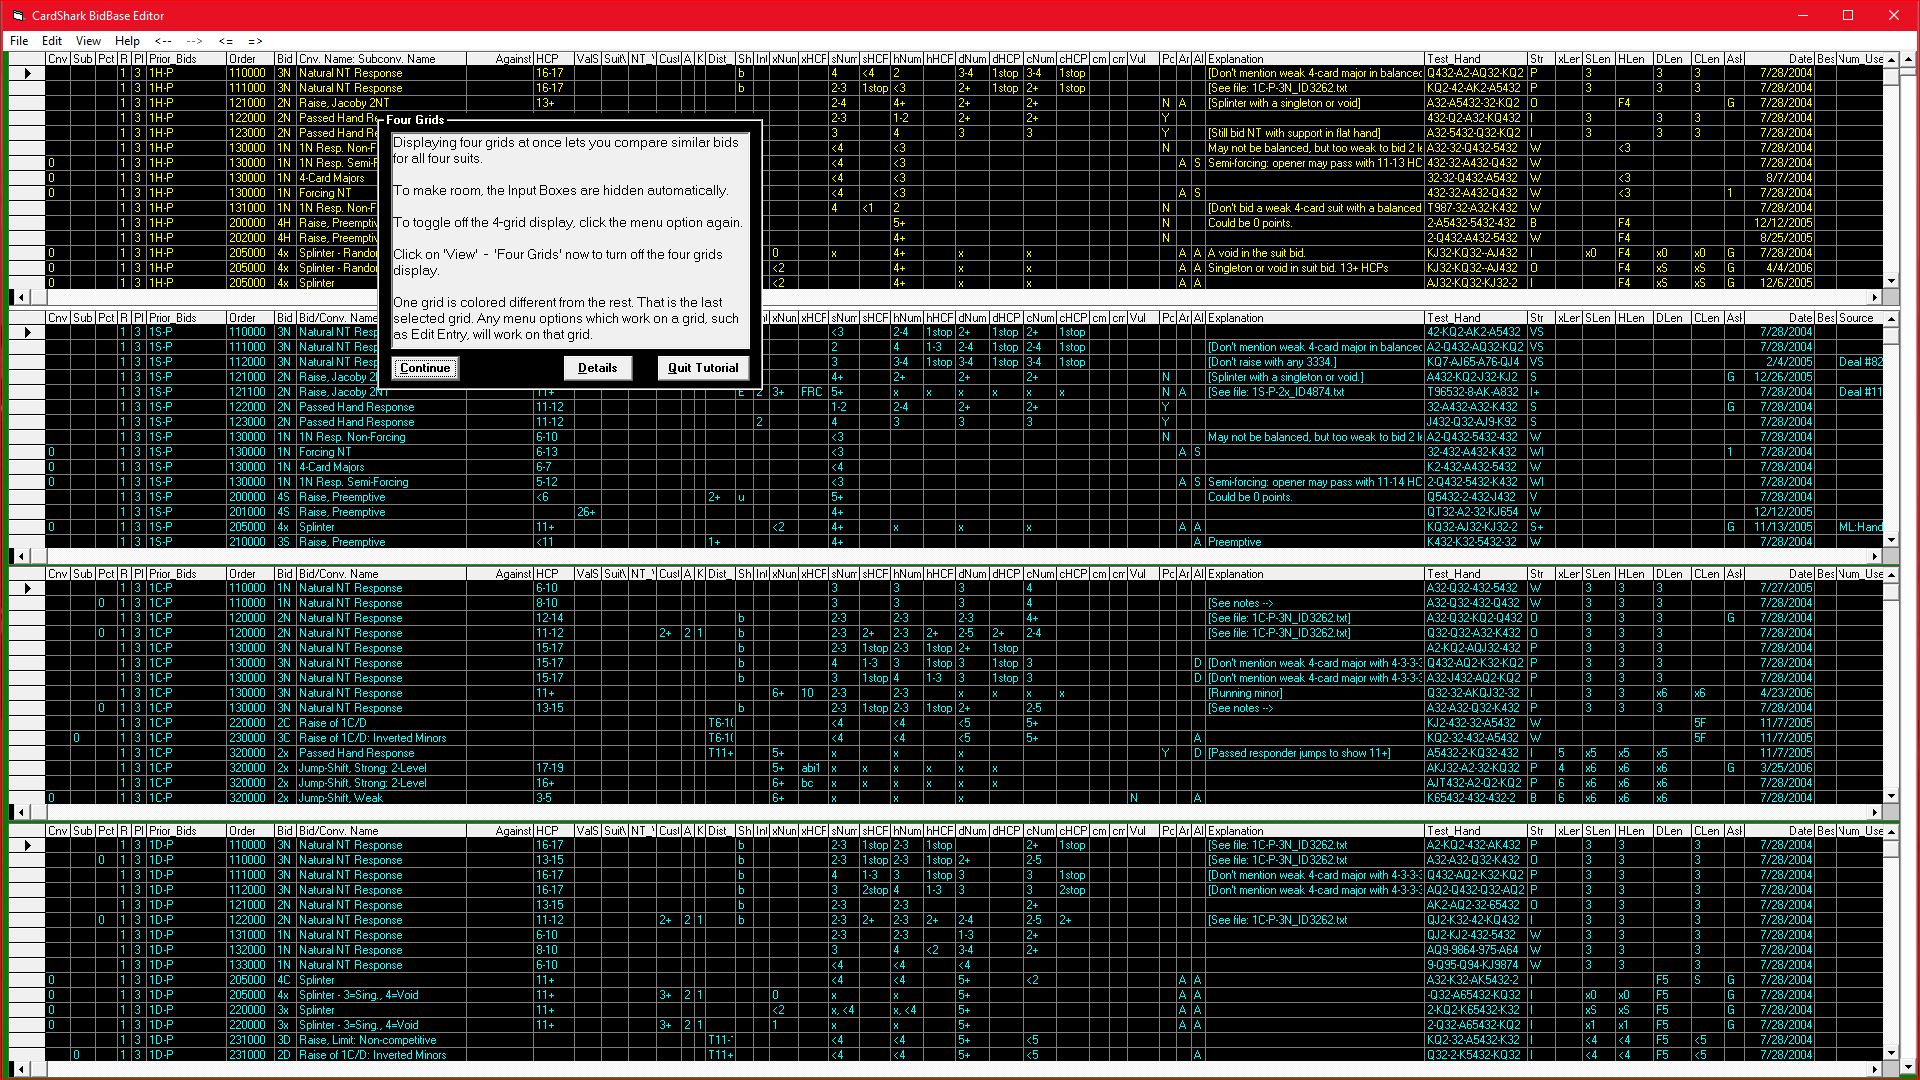
Four Grids:
Viewing four grids at once lets you compare entries for all suits, such as Prior Bids of 1C-1N-D, 1D-1N-D, 1H-1N-D, and 1S-1N-D. However, because of the space required for the grids, you cannot use the Input Boxes when viewing four grids.
Dupes Grid (Ctrl-D):
Dupes Grid lets you see if an entry for one set of Prior Bids exists for similar Prior Bids. When you select an entry in the top grid, the similar entries are displayed in the bottom grid.The purpose is to make it easer to insure that all similar entries have the same specs.
The first menu option, Show Dupes Grid, displays all entries which have the same Round #, Player #, and Bid Order Number.
Show Defined Dupes only pares down the list to include only those similar Prior Bids which have been specifically defined in the database. These are the Prior Bids which are shown in the Dupes boxes to the right of the Input Boxes.
Show same Conv.Name only does what the caption says.
As noted above entry selection is based in part on Bid Order Number ("BON"), but it is customary to give the same BON to alternative conventions which make the same bid, and then deactivate the unused conventions by putting "0" or "x" in the Pct_Used field.
If you have selected Show Defined Dupes only, you will see all entries for the same Round and Player which have the same BON. This is a good starting point because it lets you see if you have given the same Convention Name to all similar bids.
Once you have verified that all similar entries have the same Convention Name, you can click on Show same Conv.Name only to hide entries which are part of conventions which are not the same as the selected entry in the top grid. Since the point of the Dupes Grid is to compare the specs of similar entries, you do not want entries with different conventions.
Being able to see all the similar entries at once makes it easy to see which entries don't match and to update them. Because keeping the specs for similar entries consistent is so important, we recommend keeping the Dupes Grid open whenever possible.
The Dupe Boxes, at the right of the Input Boxes. contain a list of all the defined Dupe Prior Bids which are similar to the top grid's Prior Bids. If you see a set of Prior Bids in the Dupe Boxes which does not appear in the Dupes Grid, click the button to the left of it's Dupe Box to create an entry for it in the Input Boxes. Then all you (usually) have to do is press Ctrl-S to save the entry.
The Dupes Grid takes precedent over the usual second grid display, so if you want to see all the entries for one set of Prior Bids, you have to turn off the Dupes Grid menu check mark.
Once you have a full contingent of similar bids in the Dupes Grid, you can use the Edit - Compare Entries menu option to compare an entry in the top grid to all the similar ones in the Dupes Grid. You should always click on Show same Conv.Name only before comparing, and you may have to also click on Show Defined Dupes only.
You can swap grid contents by selecting a line in the bottom grid and pressing Ctrl-Up (arrow). The Prior Bids section for the selected entry will be displayed in the top grid and the Dupe Entry from the top grid will be moved down into the Dupe Entries grid.
Match Column Widths (Ctrl-M):
To change the size of the columns, place the cursor to the right of the heading of the column you wish to resize and the cursor will change to a vertical bar. Now click, hold and drag to widen or narrow the top grid.
To change the width of the columns in each grid or split to match the width of each column in the upper-left grid, click Match Column Widths in the View menu. (Each grid or split to be resized must be visible at the time.)
Hide/Unhide Input Boxes (Ctrl-I):
When you are examining data in the grids, you can view more data at once by clicking on Input Boxes in the View menu or pressing Ctrl-I.
Show/Sort Entries (Ctrl-W)
The grids (normally) do not show the entire database, They only display whichever parts of the database you specify in the Show/Sort Entries window.Click on the View menu, then on Show/Sort to specify records to display and/or sort on. Or just press Ctrl-W (which used to stand for something related to showing entries, but I can no longer remember what, and now all the good shortcut keys are already taken).
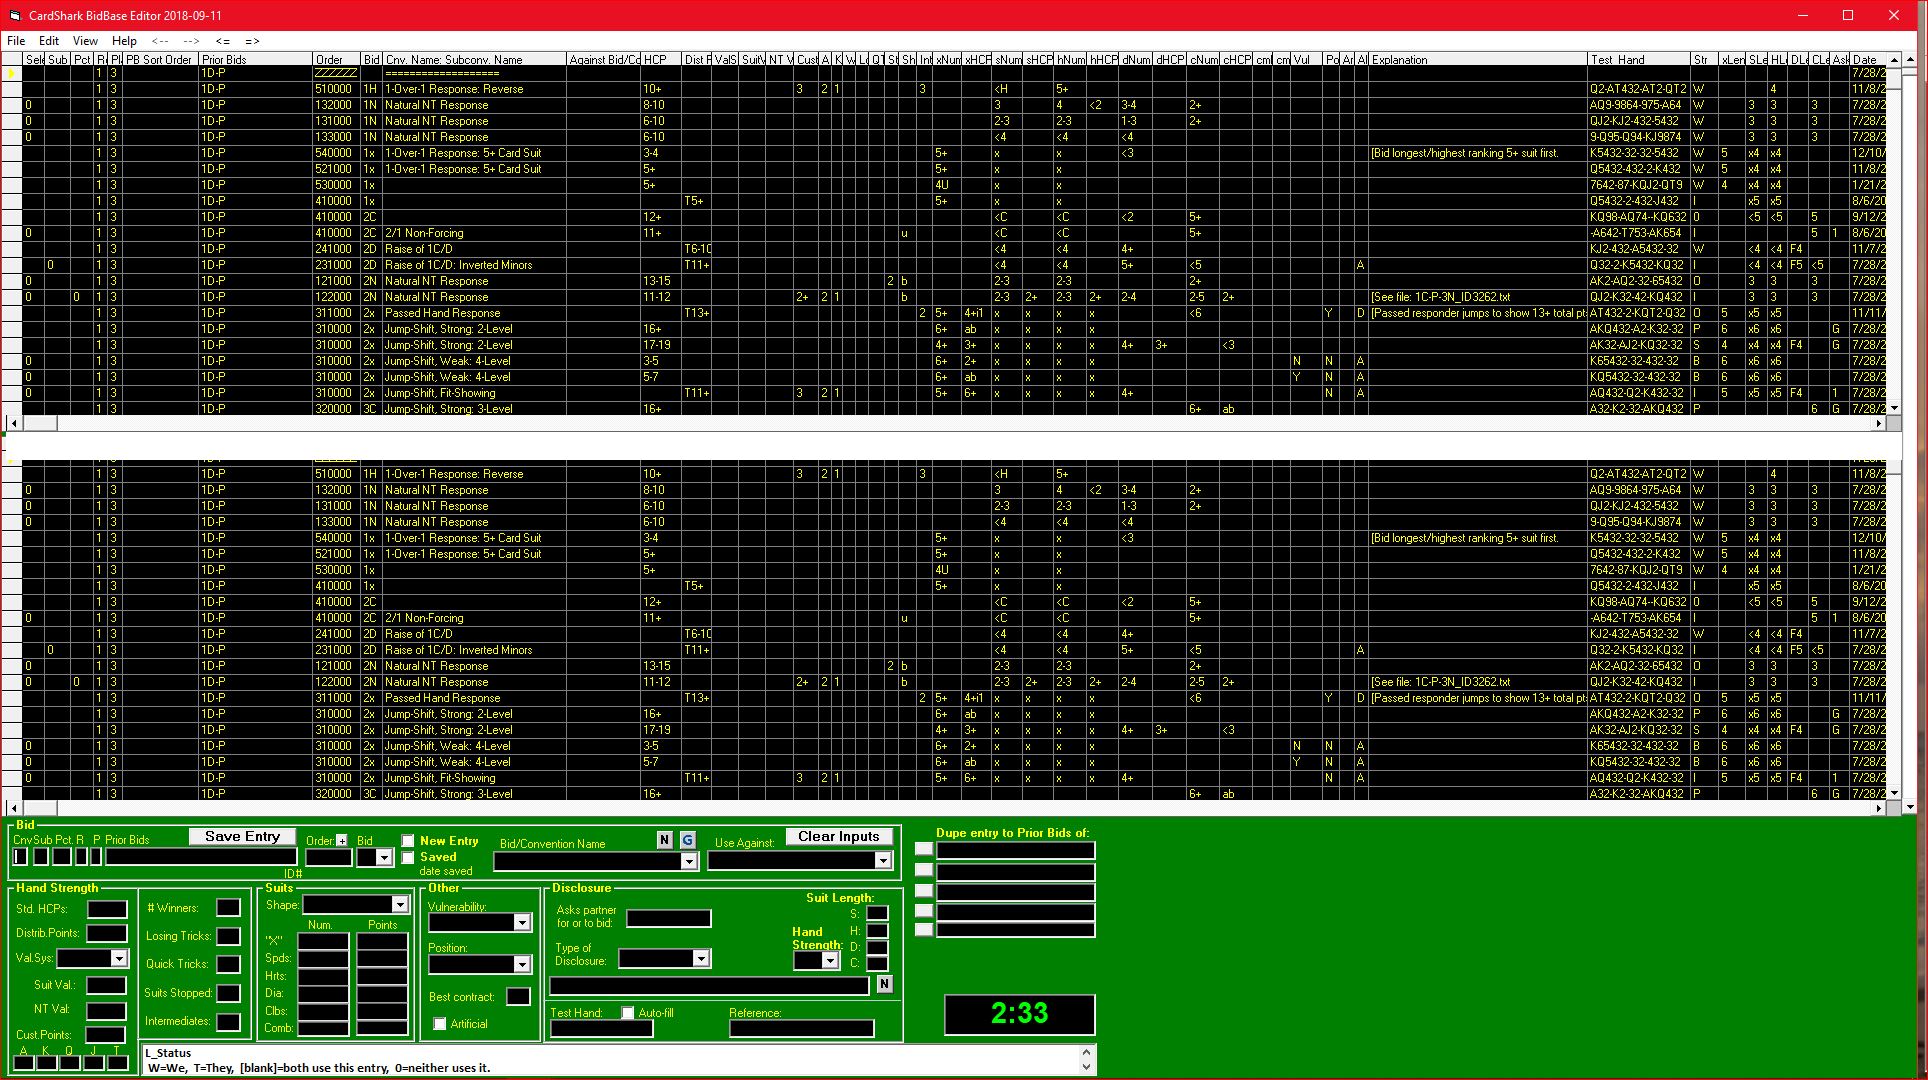
In this screen shot, the entries which are shown allow the user to view and compare all the responses to "1C-1D-1S" and to "1C-1H-1S".
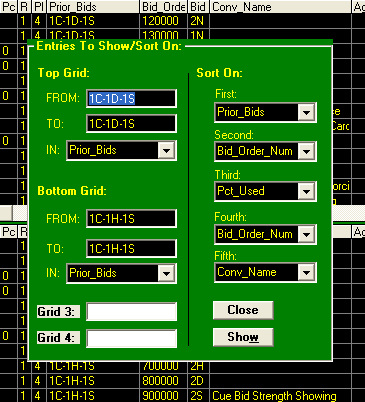 These are similar bids to which 4th seat must respond, and if you are making changes or adding to one set of bids, you would also want to make them to the other set. (A "set" or "section" of bids is the group of all entries with the same Prior Bids.)
When working on the database, you will almost always want to view one section at a time in a grid. That is, you would want the From and To boxes for each grid to be the same.
To display all the entries for the second chair after an opening of, say, 1H, put 1H in both the FROM and TO box for Prior_Bids. Notice that BidBase ignores opening Passes, so when entering Prior Bids, start with the first non-passing bid.
To display all entries for a particular convention, you can enter the convention name in the FROM and TO boxes and select Conv_Name in the IN list.
As opposed to entering Prior Bids, when you enter Convention Names, you often will want the From and To fields to be different. For example, to see all entries related to Overcalls, you would enter "Overcalls" in the From field and perhaps "Overcallsz" in the To field. The "z" at the end of the To field will insure that all entries will be shown which start with "Overcalls...".
You are not limited to any particular fields. You can specify the limits for any column in the grid and sorting by whichever field(s) give you the desired results.
If a From or To box will not accept a character you type, it is because when the IN drop-down list is set to Prior_Bids. If you are entering data for some other field, change the IN box to the desired field.
Sorting:
You can specify up to five sort fields. When specifying the display on Prior_Bids, you normally will sort on Round first, then Player, then Prior_Bids, then Bid_Order_Number, then Pct_Used. This displays the entries in the grid in the same order which they will be evaluated by bridge software.
When a lot of different conflicting systems are present, such as systems for overcalling a 1N opening bid, it is easier to see the bids for each system by sorting by Conv_Name, then Prior_Bids, and then by Bid_Order_Number.
To make it easier to see just the bids you have selected (i.e.: those with the Pct_Used field blank), sort on Pct_Used first, then Round, Player, Prior_Bids, and Bid_Order_Number. Notice that this groups the blank Pct_Used field entries together, so any bids which are not blank but which have a Pct_Used greater than 0 are part of your system, but will not be grouped with the blank Pct_Used entries. As a result, we do not recommend this setting except for temporarily viewing the bids -- not when adding new entries where it might be easy to overlook that an entry you want to add is already in the database but has a non-blank Pct_Used field.
To see all entries for a particular bid, such as 1S overcalls, put 2 in FROM and 2 in TO for Player, then sort by Bid, by Prior_Bids and by Pct_Used. When the list comes up, scroll down to the 1S bids. They will all be grouped together in the order: 1C-1S, 1D-1S, 1H-1S. (Each of these may have several entries for the same bid, both active and inactive.)
Test Hands Verified:
When you press Alt-W or click the Show button, the selected range of entries is shown in the grid(s). In addition, if you are using Prior_Bids as the control field, the program automatically checks the entries in the top grid to verify that the Test Hand for each entry is still valid. This is very fast, and it helps insure the validity of the database.
<-- --> (Scroll Previous Sections On Grids)
The left and right "arrows" on the menu bar work like the back and forward arrows in a web browser, such as the ones above this window. Clicking <-- takes you back to the previous grid contents and --> takes you forward to the next grid contents which you have previously displayed, which may or may not be in bid sequence order.<= => (Increment/Decrement Sections On Grids)
The <= and => arrows increment/decrement the grid contents. You can use these arrows if you are using only one grid, or if you are using two grids and want to increment or decrement both grids.
If you are using two grids and only want to increment or decrement the last one that you clicked on, then use the View - Jump To Next Section menu command or press Ctrl-J.
Here is an example which illustrates the difference between scrolling through previously viewed sections and incrementing/decrementing sections.
- Bring up the Show window to display '1C-P-1S'.
- Bring up the Show window again to display '1C-P'
- After '1C-P' displays, click <-- to go back to '1C-P-1S'.
- Now:
- If you click --> you will return to '1C-P', but
- If you click =>, you will increment to '1C-P-1N'.
Footnote:
Despite being an advocate of LOTT, I've often seen that on the VCC web site's results pages that top scores sometimes go to 4-3 and 5-2 major suit fits.